
Introduction #
This guide explains how to automate TradingView strategy alerts in Ironbeam using PickMyTrade.
Follow each step carefully to ensure that strategy signals from TradingView trigger real trades in your Ironbeam account.
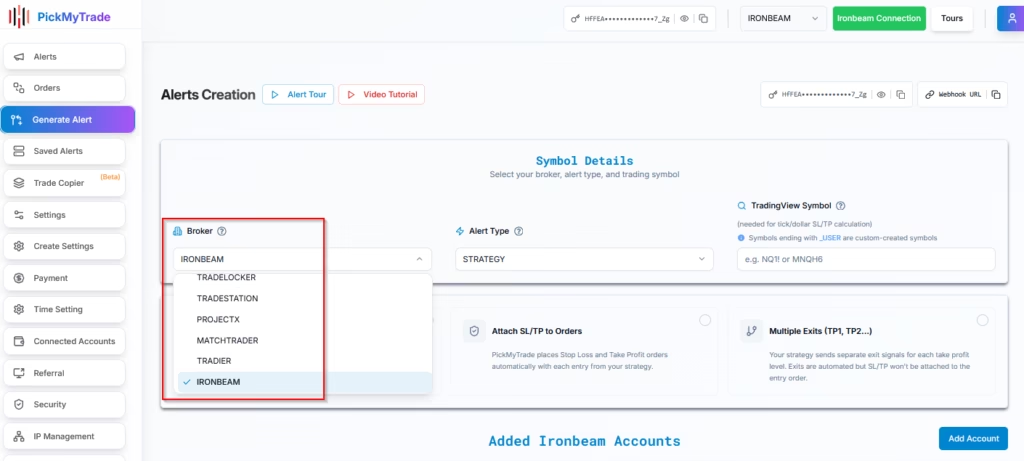
1. Select Ironbeam as Your Broker #
From the PickMyTrade interface, choose your broker as:Ironbeam
Connect Ironbeam with PickMyTrade – Easy Setup Guide
This ensures that all generated alerts will be routed for execution into your connected Ironbeam account.
2. Choose Strategy or Indicator Alert in TradingView #
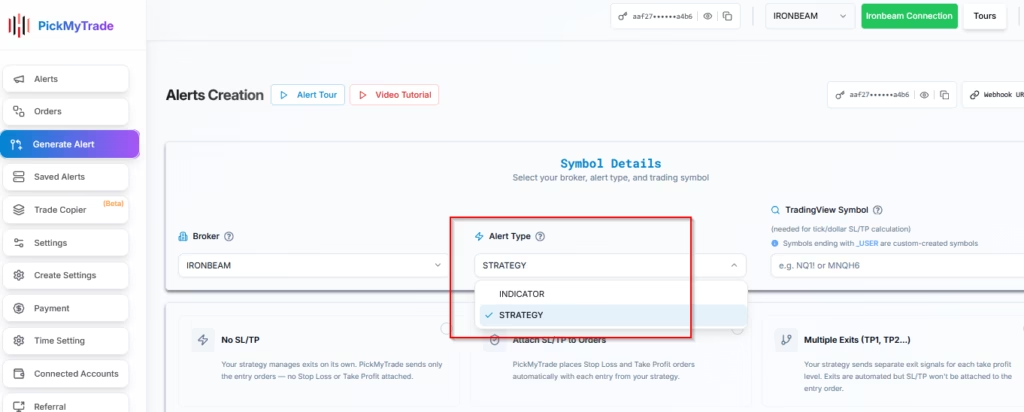
Select the appropriate alert type based on your TradingView setup:
STRATEGY: For alerts generated by a TradingView strategy (e.g., Supertrend Strategy, RSI Strategy). This uses the Strategy Tester and automatically triggers alerts when a strategy’s logic executes.INDICATOR: For alerts based on chart conditions (e.g., RSI crosses above 70). This does not use the Strategy Tester and is based on plotted conditions or alert functions.
3. Enter the TradingView Symbol #
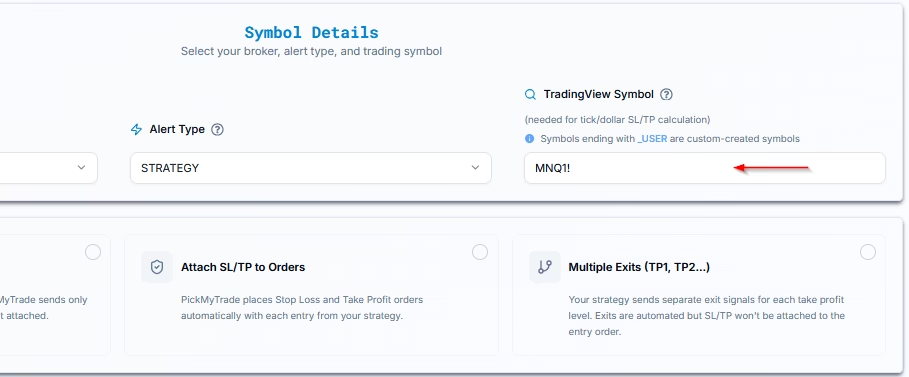
Enter the TradingView symbol (e.g., MNQ1!).
This field is optional unless you’re using stop-loss types like:
- Ticks
- Total Profit / Loss (USD)
4. Managing Exit Rules in Automated TradingView Strategies #
Determine how exits will be handled in your strategy:
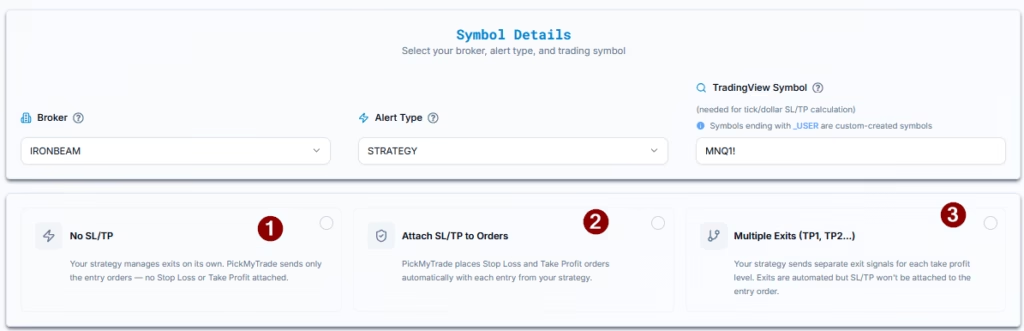
Option 1: No SL/TP (Strategy Controlled Exits) #
- Select this if your TradingView strategy fully manages entries and exits
- PickMyTrade will NOT place any Stop Loss or Take Profit orders
- All exits will be executed only when TradingView sends exit alerts
Use this when:
Your strategy already includes complete exit logic
Option 2: Attach SL/TP to Orders #
- Select this if your strategy does NOT handle exits
- PickMyTrade will place Stop Loss (SL) and Take Profit (TP) with each entry
Features:
- Choose SL/TP type (percentage, price, Total Profit/Loss, etc.)
- Only one SL and one TP per order is supported
Use this when:
You want simple, fixed risk management handled by PickMyTrade
You can refer to the Stop Loss / Take Profit Types guide in PickMyTrade for exact formulas and examples. Click here
Option 3: Multiple Exits (TP1, TP2, etc.) # #
- Select this if your TradingView strategy uses multiple take-profit levels
- PickMyTrade will NOT require SL/TP configuration
- All exits will be executed based on TradingView alerts
Note:
When using multiple exits, SL/TP cannot be attached to the entry order.
Use this when:
Your strategy scales out of positions (partial exits)
Here’s an example of how multiple exits work:
- Your strategy enters a long position with 3 contracts.
- TP1 is hit → the strategy sends Sell 1, leaving a long position of 2 contracts.
- TP2 is hit → the strategy sends Sell 1, leaving a long position of 1 contract.
- TP3 is hit → the strategy sends Sell 1, bringing the net position to 0.
If, instead of reaching the take-profit levels, the trade hits the stop loss, your strategy should send a close or flat signal. PickMyTrade will then close the remaining open position and cancel any active or pending orders for that symbol, leaving the net position at 0.
5. Connect Ironbeam Account for Automation #
5.1 Adding a Ironbeam Account in Your Current PickMyTrade Login
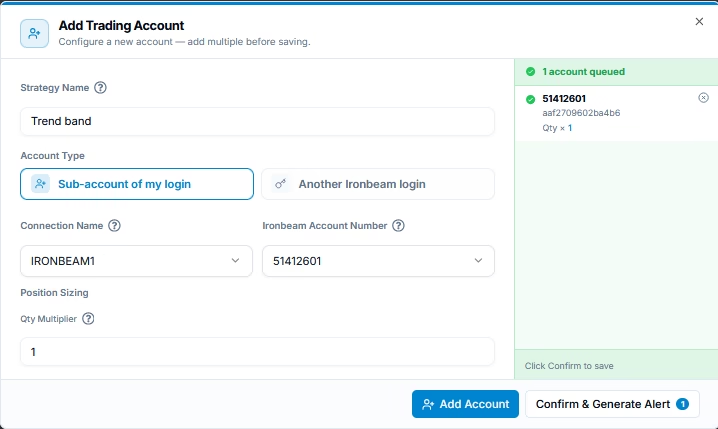
| Field Name | Example Input | Description |
|---|---|---|
| PickMyTrade Conn. Name | Ironbeam | The Ironbeam connection name from your PickMyTrade account |
| Ironbeam Acc. Name | 51412601 | The actual Ironbeam account where trades should be sent |
| Option | Quantity Multiplier | Choose how trade size is calculated |
| Quantity Multiplier | 1 | If set to 2, all trade sizes will be doubled |
Make sure your Ironbeam connection is active and verified in the account.
5.2 Adding a Ironbeam Account from Another PickMyTrade Login
Use this setup if you want to send trades into a different PickMyTrade account — useful when managing multiple logins.
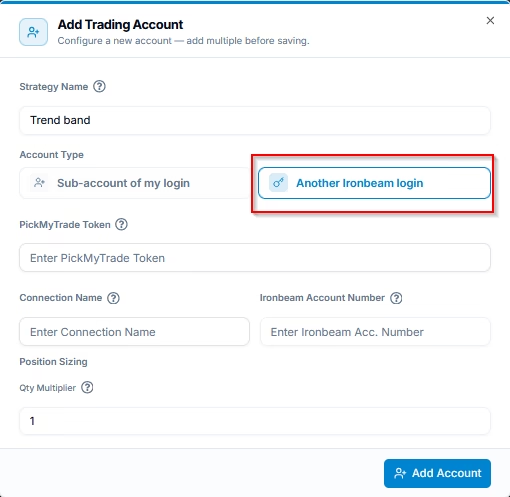
| Field Name | Example Input | Description |
|---|---|---|
| PickMyTrade Token | abcd1234xyz | Token from the external PickMyTrade account you want to trade through |
| PickMyTrade Conn. Name | Ironbeam | Must match the Ironbeam connection inside that target account |
| Ironbeam Acc. Name | 6804261 | Must match exactly as registered in Ironbeam |
| Quantity Multiplier | 1 | All trade sizes are multiplied by this number |
Ensure the PickMyTrade token is copied accurately and the Ironbeam connection exists in the destination account.
Execution will fail if the mapping is incorrect.
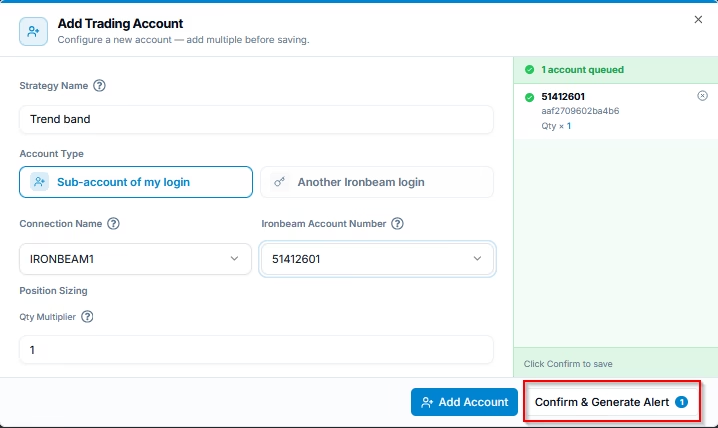
5.3 Generate Alert Code for Strategy Execution
Once all accounts are added and configured, click Confirm & Generate Alert button.
6. Create and Automate TradingView Alerts via PickMyTrade #
Once you’ve configured everything in PickMyTrade, follow these steps in TradingView:
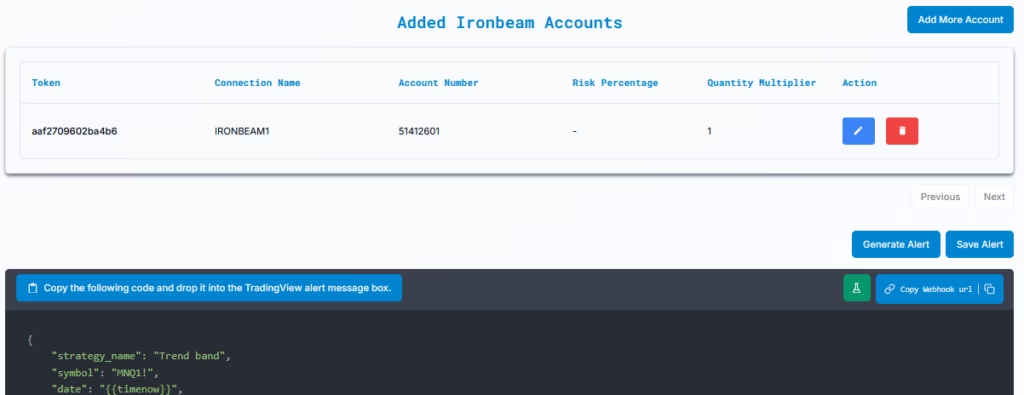
- Copy the alert message JSON
- Open TradingView → Click “+ Create Alert”
- Paste the alert message into the Message field
- Paste the Webhook URL provided by PickMyTrade
- Set your alert condition and frequency
- Click Create Alert
You’re done! Your TradingView strategy or indicator is now connected to your Ironbeam account through PickMyTrade — ready for automated, real-time execution.
Next, follow the link below to learn how to set up your TradingView alert for automated trading:
Setting Up TradingView Alerts for Automated Trading
More Resources #
Want to automate trades on platforms beyond Rithmic, such as Interactive Brokers, TradeLocker, TradeStation, or ProjectX?
Explore all PickMyTrade setup guides
Using Tradovate instead?
View the Tradovate automation guide
Ready to connect Ironbeam?
See Ironbeam automation on pickmytrade.io
Last updated: September 29, 2026


