
This guide explains the complete process for automating TradingView indicator alerts in Tradier using PickMyTrade. Whether you’re trading stocks or options, this method ensures your alerts trigger live orders seamlessly.
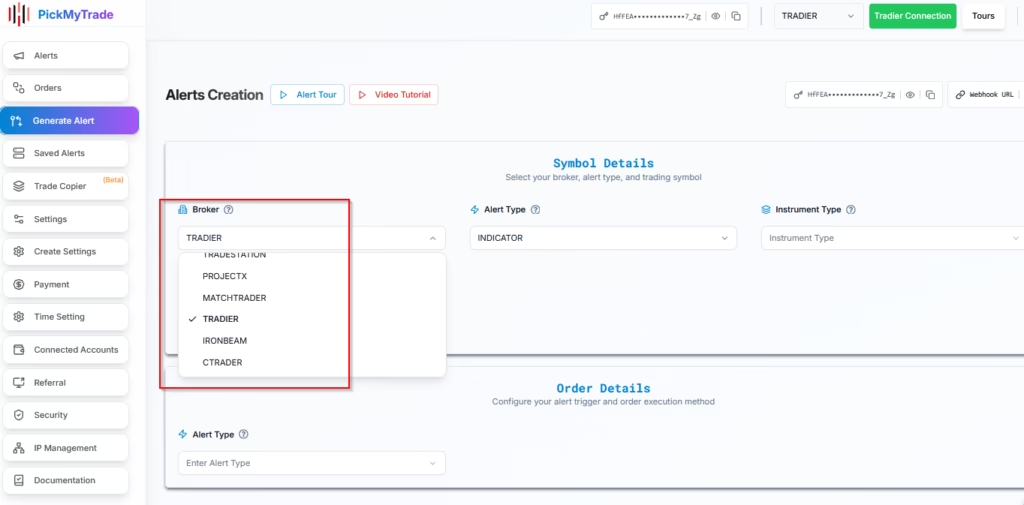
1. Select Tradier as Your Broker #
- Broker: Select Tradier from the PickMyTrade broker list.
- Ensure your Tradier account is connected and authorized via secure login or API credentials.
Connect Tradier with PickMyTrade – Easy Setup Guide
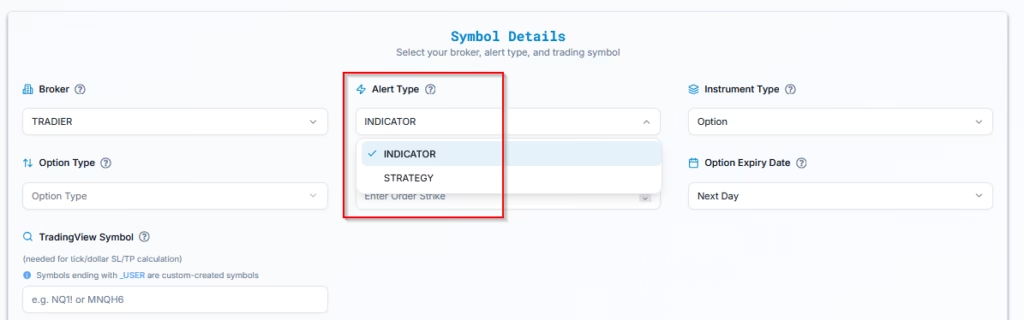
2. Choose Alert Type for TradingView Indicators #
Two alert types are available:
- INDICATOR — Use this if you are triggering alerts manually or based on TradingView chart indicators.
- STRATEGY — Use only if you’re automating a Pine Script strategy.
Example:
- Alert Type: INDICATOR
3. Choose Asset Type for Tradier Execution #
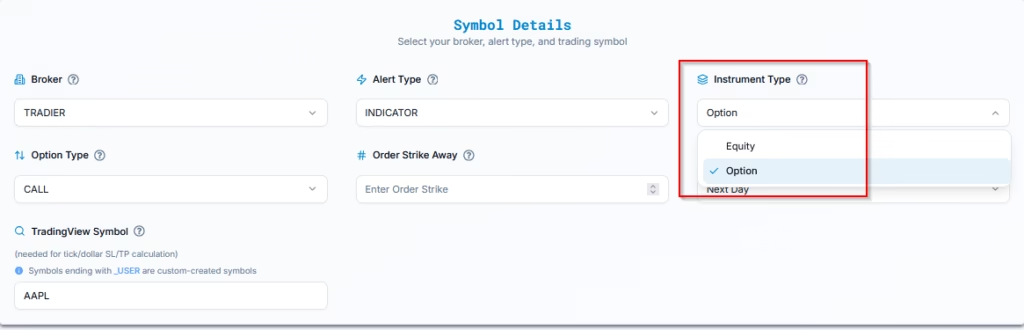
Select the appropriate instrument type based on what you’re trading:
- Equity – For equity shares like AAPL, MSFT, etc.
- Options – For equity options like AAPL Calls and Puts.
In this setup, we are selecting Options because we are automating trades for AAPL options.
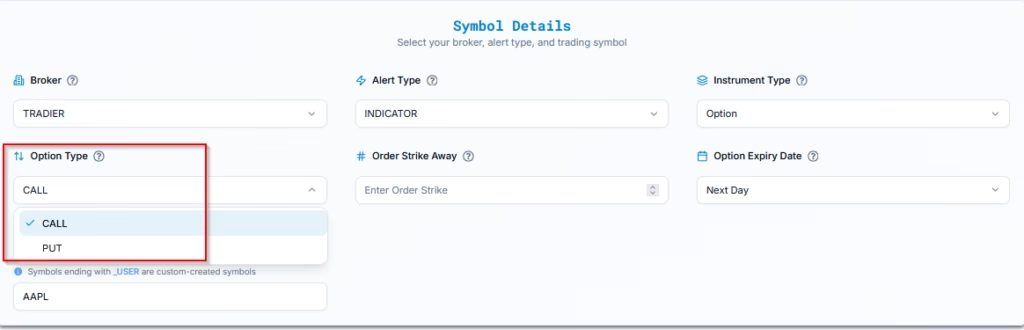
4. Select Call or Put Option Type for Tradier Orders #
| Setting | Explanation | Example |
| Call | Expecting the stock price to rise. | Buying an AAPL Call when the stock price is at $150, expecting it to go higher. |
| Put | Expecting the stock price to fall. | Buying a TSLA Put when the stock price is at $700, expecting it to drop. |
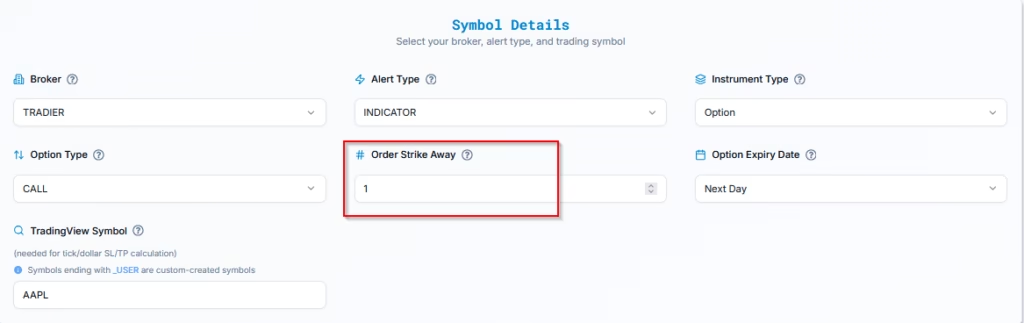
5. Set Strike Price Logic for Option Alerts in TradingView #
Strike Price Settings (Example for AAPL @ $212.15)
| SETTING | EXPLANATION | EXAMPLE (AAPL @ $212.15) |
|---|---|---|
| Strike Away | Defines how far the strike is from the market price. | Strike Away: 2 → Call strike: 214.15, Put strike: 210.15 |
| At-the-Money (ATM) | Strike price is closest to the market price. | Call & Put strike: 212.5 |
| In-the-Money (ITM) Calls | Strike below the market price (option has intrinsic value). | ITM Call strikes: 210, 207.5, 205… |
| In-the-Money (ITM) Puts | Strike above the market price (option has intrinsic value). | ITM Put strikes: 215, 217.5, 220… |
| Out-of-the-Money (OTM) Calls | Strike above the market price (no intrinsic value). | OTM Call strikes: 215, 217.5, 220… |
| Out-of-the-Money (OTM) Puts | Strike below the market price (no intrinsic value). | OTM Put strikes: 210, 207.5, 205… |
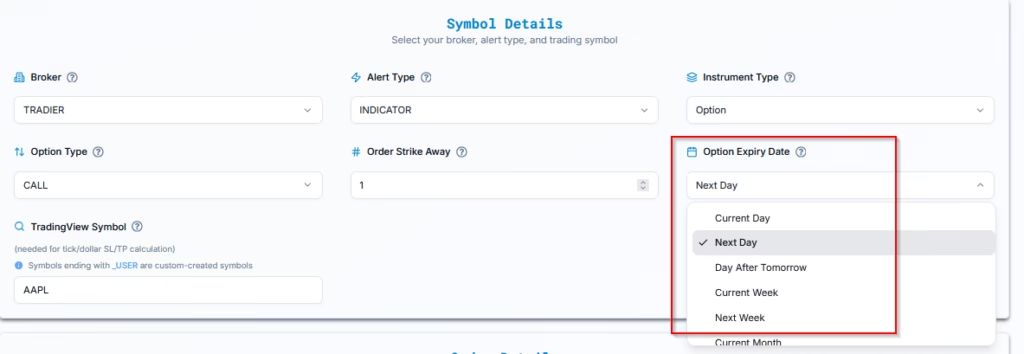
6. Configure Option Expiry Dates for AAPL Options in Tradier #
Select relative expiry using the current date for reference (e.g., May 14, 2026):
| Expiry Type | Easy Explanation | Example (AAPL Call Option, Today is May 14, 2025) |
|---|---|---|
| Current Day | Ends today, May 14, 2026. | Buy call option, expires at close of May 14, 2026. |
| Next Day | Ends tomorrow, May 15, 2026. | Buy call option, expires at close of May 15, 2026. |
| Day After Tomorrow | Ends in 2 days, May 16, 2026. | Buy call option, expires at close of May 16, 2026. |
| Current Week | Ends this week, May 16, 2026. | Buy call option, expires at close of May 16, 2026. |
| Next Week | Ends next week, May 23, 2026. | Buy call option, expires at close of May 23, 2026. |
| Current Month | Ends this month, May 30, 2026. | Buy call option, expires at close of May 30, 2026. |
| Next Month | Ends next month, June 28, 2026. | Buy call option, expires at close of June 28, 2026. |
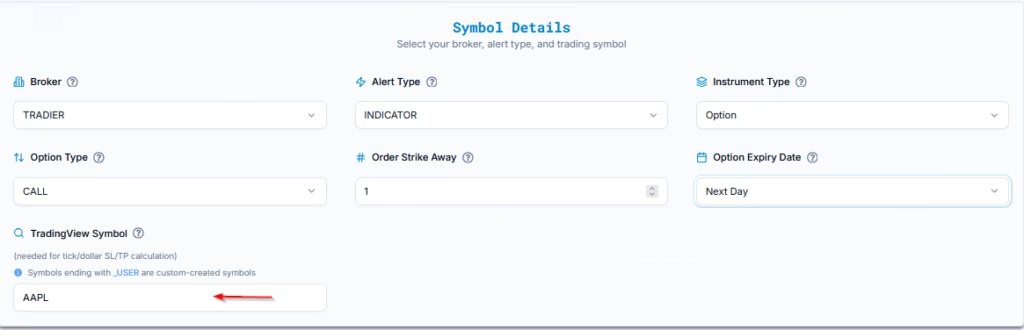
7. Enter the Correct TradingView Symbol for Accurate Mapping #
- TradingView Symbol: AAPL
- Use Case: Only required when your Stop Loss type is based on:
- Ticks
- Total Loss
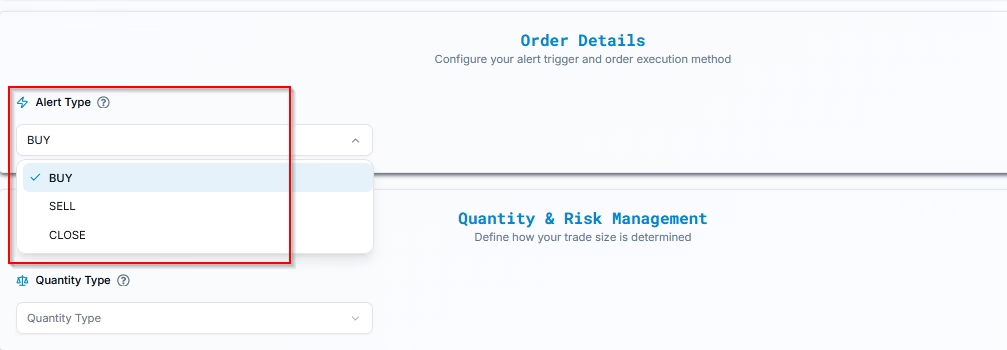
8. Order Type and Alert Behavior #
| Setting | Explanation | Example |
| Buy | Opens a long position when the alert is triggered. | Buying a Call option on AAPL |
| Sell | Opens a short position when the alert is triggered. | Buying a Put option on TSLA |
| Close | Closes an existing position if one exists. | Closing a previously bought Call/Put |
9. Set Trade Quantity and Risk Management in Tradier Alerts #
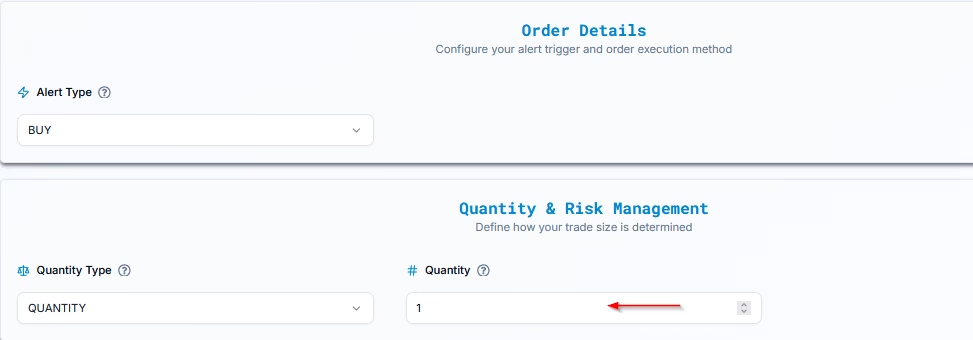
Option A: Quantity #
- Quantity Type: QUANTITY
- Quantity Value: 1
Defines a fixed number of contracts for each trade.
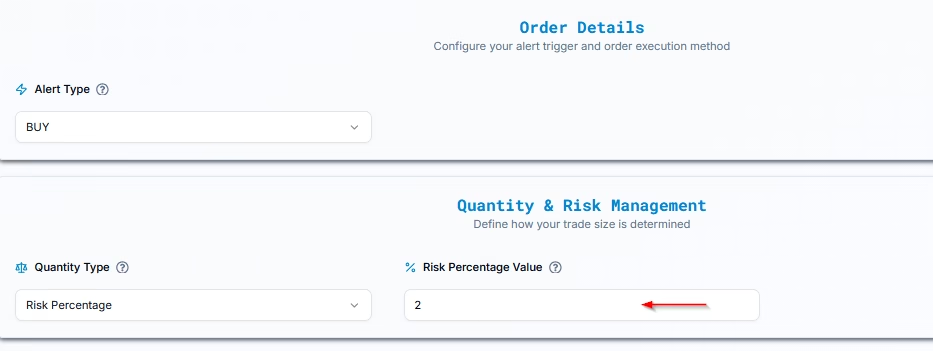
Option B: Risk Percentage #
- Quantity Type: RISK PERCENTAGE
- Value: e.g., 2%
When using Risk Percentage, the system calculates your trade size so that your maximum loss equals a fixed percentage of your total account balance, based on the stop-loss distance.
10. Define Stop Loss and Take Profit for Automated Option Alerts #
PickMyTrade supports five SL/TP configuration types. Select one based on your preferred method:
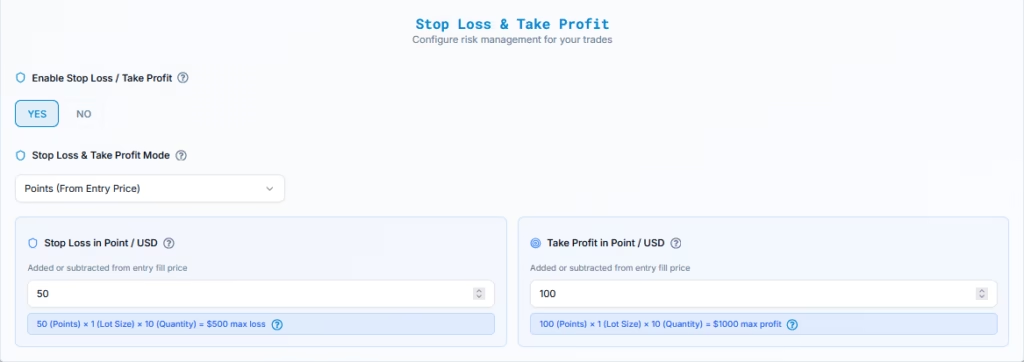
Point(From Entry Price)
Order Configuration:
- Stop Loss in USD: Customer manually inputs the points value they are willing to risk on the trade ( in this example, we’ve chosen 50 points).
- Take Profit in USD: Customer manually inputs the points value they aim to gain from the trade ( in this example, we’ve chosen 100 points).
How It Works:
- Stop Loss: The specified points value is subtracted from the entry price to determine the stop loss level. The total loss may vary depending on the number of shares.
- Take Profit: The specified points value is added to the entry price to determine the take profit level.
Settings and Examples:
Stop Loss (Point From Entry Price):
- Setting: Enter the Stop Loss in points. This amount determines how much you are willing to lose if the market moves against your position.
- Example: Buy AAPL at $239.07 with a Stop Loss at $189.07 (50.00 below entry). 1 Point = $1 USD
Total loss: $50.00 × 1 (lot size) × 10 (number of shares) = $500.
Take Profit (Point From Entry Price):
- Setting: Enter the Take Profit in points. This amount sets your target gain if the market moves in your favor.
- Example: Buy AAPL at $239.07 with a Take Profit at $339.07 (100.00 above entry). 1 Point = $1 USD
Total profit: $100.00 × 1 (lot size) × 10 (number of shares) = $1,000.
Percentage
Order Configuration:
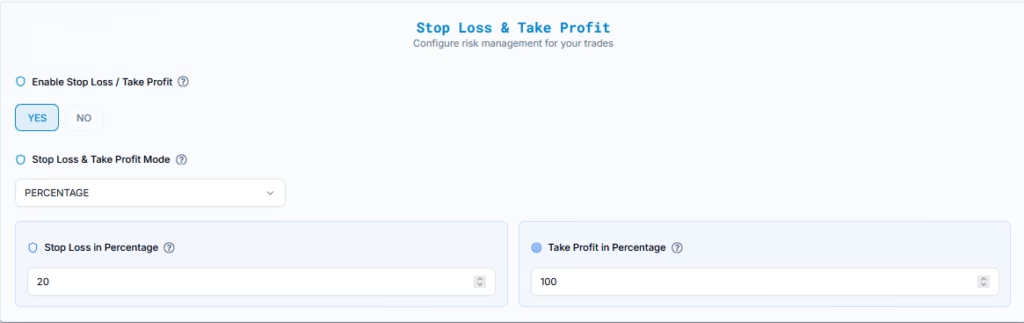
- Stop Loss in Percentage: Customer manually inputs the percentage they are willing to risk on the trade (in this example, we’ve chosen 20%).
- Take Profit in Percentage: Customer manually inputs the percentage they aim to gain from the trade (in this example, we’ve chosen 100%).
How It Works:
- Stop Loss: The specified percentage is calculated based on the entry price and subtracted to determine the stop loss level. The total loss varies depending on the entry price and lot size.
- Take Profit: The specified percentage is calculated based on the entry price and added to determine the take profit level.
Settings and Examples:
Stop Loss (Percentage):
- Setting: Enter the Stop Loss as a percentage of the entry price. If the market price falls by this percentage, the trade automatically closes to limit your loss.
- Example: Buy AAPL at $239.07 (Entry Price)
- Stop Loss: 20% below entry price
- 20% of $239.07 = $239.07 × 0.20 = $47.81
- Stop Loss Price = $239.07 − $47.81 = $191.26
Take Profit (Percentage):
- Setting: Enter the Take Profit as a percentage of the entry price. If the market price rises by this percentage, the trade automatically closes to secure your profit.
- Example: Buy AAPL at $239.07 (Entry Price)
- Take Profit: 100% above entry price
- 100% of $239.07 = $239.07 × 1.00 = $239.07
- Take Profit Price = $239.07 + $239.07 = $478.14
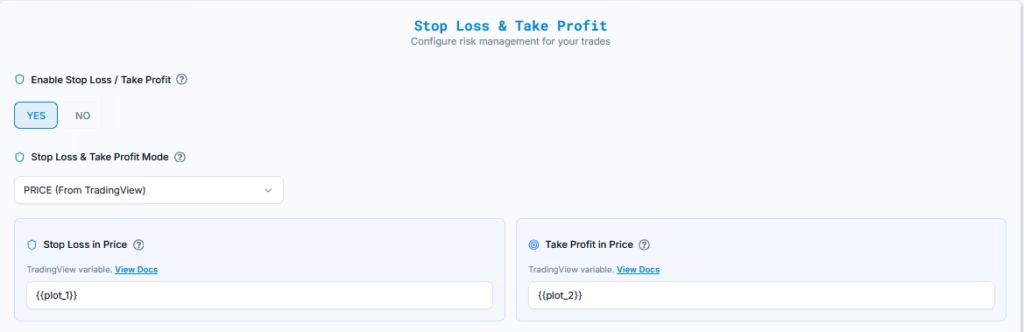
Price (From TradingView Plot)
Use values directly from TradingView plots or variables like {{plot_0}}, {{plot_1}}, etc.
- Stop Loss Input:
{{plot_1}} - Take Profit Input:
{{plot_0}}
Understanding {{plot_x}} Variables in TradingView #
In TradingView, placeholders like {{plot_0}}, {{plot_1}}, {{plot_2}}, etc., are automatically generated when you create an alert based on an indicator. These represent different values plotted by the indicator on your chart.
Placeholder Reference: #
{{plot_0}}— The first plotted value from the indicator{{plot_1}}— The second plotted value{{plot_2}}— The third, and so on
How They Work for Stop Loss & Take Profit #
Let’s say your custom indicator plots two key levels:
- A Stop Loss level
- A Take Profit level
In that case:
- Stop Loss might be represented as
{{plot_1}} - Take Profit might be represented as
{{plot_2}}
These placeholders allow you to send dynamic values with each alert — no need to manually hard-code prices like 279.
Reference Document: TradingView Plot Placeholder Integration
Ticks
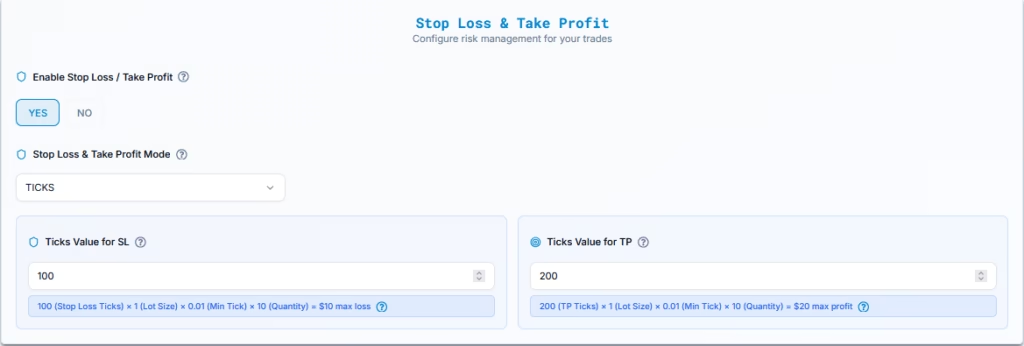
Order Configuration:
- Stop Loss in USD: Customer manually inputs the ticks value they are willing to risk on the trade.
- Take Profit in USD: Customer manually inputs the ticks value they aim to gain from the trade.
Settings and Examples:
- AAPL Market Price: $239.07
- Tick Size: $0.01 (since AAPL trades in cents)
- Quantity: 10 contracts (I’m assuming each contract represents 1 share of AAPL — let me know if that’s different!)
Now for the Stop Loss & Take Profit:
- Stop Loss:
- Ticks: 100
- Tick Size: $0.01
- 100 ticks × $0.01 = $1.00
- Stop Loss Price: $239.07 − $1.00 = $238.07
- Total Loss Calculation:
- Loss per Tick: $0.01
- Quantity: 10 contracts
- Total Loss: 100 ticks × $0.01 × 10 = $10.00
- Take Profit:
- Ticks: 200
- Tick Size: $0.01
- 200 ticks × $0.01 = $2.00
- Take Profit Price: $239.07 + $2.00 = $241.07
- Total Profit Calculation:
- Profit per Tick: $0.01
- Quantity: 10 contracts
- Total Profit: 200 ticks × $0.01 × 10 = $20.00
So your numbers actually make total sense!
- Total Loss for 10 Contracts: $10.00
- Total Profit for 10 Contracts:$20.00
Calculation Details
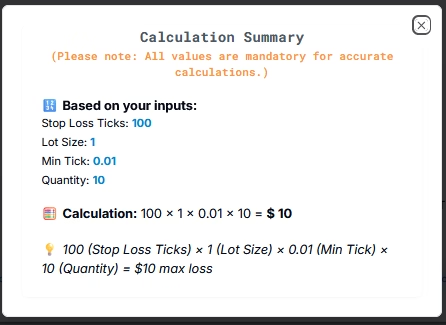
Each field (Stop Loss, Take Profit) has a small question mark (?) icon next to it.
When you click the icon, it opens a “Calculation Details” popup, showing:
- The Formula used
- The Values Entered by the user
- The Final Calculation result
Formula for Stop Loss:Stop Loss Amount = Stop Loss Ticks × Lot Size × Min Tick × Quantity
Values:
Stop Loss Ticks: 100
Lot Size: 1
Min Tick: 0.01
Quantity: 10
Final Calculation:
Stop Loss Amount = 100 × 1 × 0.01 × 10 = 10.00
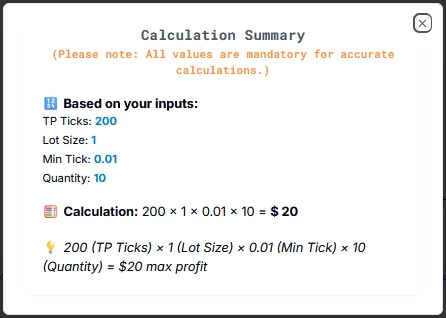
Formula for Take Profit:Take Profit Amount = Take Profit Ticks × Lot Size × Min Tick × Quantity
Values:
Take Profit Ticks: 200
Lot Size: 1
Min Tick: 0.01
Quantity: 10
Final Calculation:
Take Profit Amount = 200 × 1 × 0.01 × 10 = 20.00
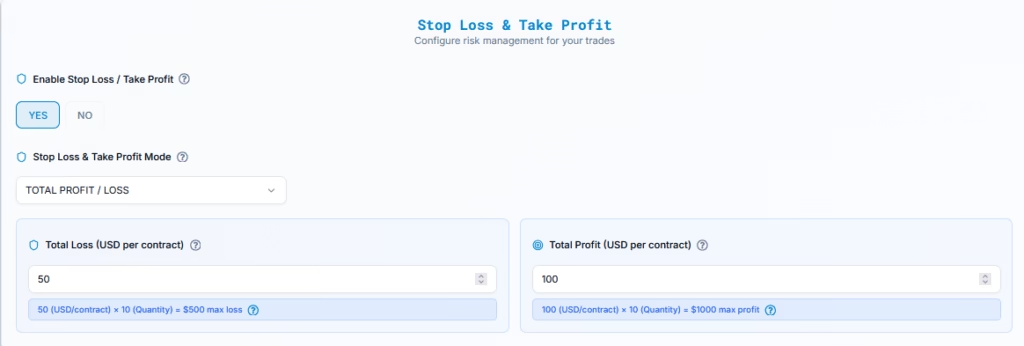
Total Profit (USD per Contract)
Order Configuration:
- Stop Loss in USD: Customer manually inputs the dollar amount they are willing to risk on the trade ( in this example, we’ve chosen $50).
- Take Profit in USD: Customer manually inputs the dollar amount they aim to gain from the trade ( in this example, we’ve chosen $100)
Settings and Examples:
- Example: Let’s say you’re targeting $100 per contract.
- Total Contracts: 10
- Total Profit for 10 Contracts: $100 × 10 = $1,000
- Take Profit Price Calculation:
- $100 per contract ÷ $0.01 tick size = 10,000 ticks.
- Take Profit Price: $239.07 + ($0.01 × 10,000) = $339.07
Formula for Total Take Profit:Total Profit Amount = Total Profit per Contract × Quantity
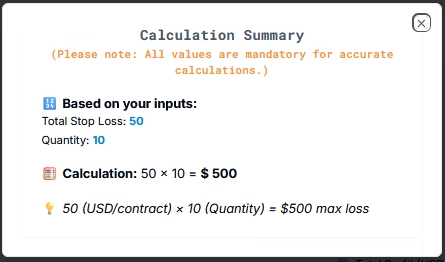
Formula for Total Take Profit:Total Loss Amount = Total Loss per Contract × Quantity
Values:Total Take Loss per Contract: $50
Quantity: 10
Final Calculation:Total Profit Amount = $50 × 10 = $500.00
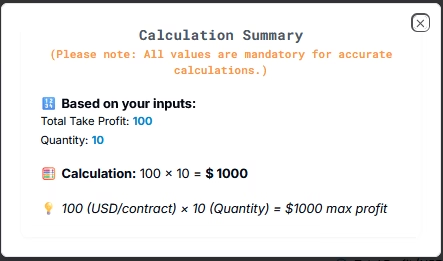
Formula for Total Take Profit:Total Profit Amount = Total Take Profit per Contract × Quantity
Values:Total Take Profit per Contract: $100
Quantity: 10
Final Calculation:Total Profit Amount = $100 × 10 = $1,000.00
11. Account Selection and Configuration for Tradier #
Once your alert and SL/TP settings are configured, the next step is selecting the trading account for execution. PickMyTrade supports both single-account and multi-account execution for Tradier, with options for position sizing via Quantity Multiplier or Risk Percentage.
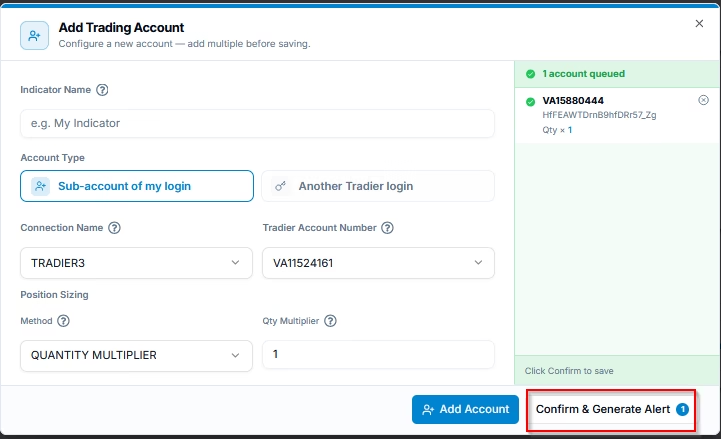
11.1 Add TradeStation Account in Current PickMyTrade Account
Use this configuration if you’re adding a Tradier account to the PickMyTrade account you’re currently logged into.
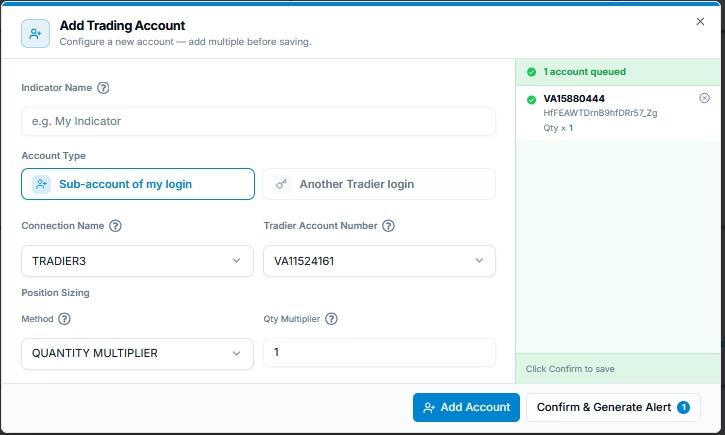
| Field Name | Example Input | Explanation |
| PickMyTrade Conn. Name | TRADIER3 | Enter the connection name associated with this PickMyTrade account. |
| TRADIER Acc. Name | VA2819830 | Enter the Tradier account name exactly as it appears in the trading platform. |
| Option | QUANTITY MULTIPLIER / RISK PERCENTAGE | Choose QUANTITY MULTIPLIER to adjust trade sizes or RISK PERCENTAGE to manage risk per trade. |
| QUANTITY MULTIPLIER | 1 (if selected) | If a Quantity Multiplier of 2 is set, all trade sizes will be doubled.Example: If the usual trade size is 5 contracts, and a multiplier of 2 is applied, the system will place trades with 10 contracts. |
| RISK PERCENTAGE | 2% (if selected) | If a Risk Percentage of 2% is set, each trade will risk 2% of the total capital in the account.Example: With an account balance of $50,000 and a 2% risk setting, the maximum risk per trade will be $1,000. |
Ensure the Tradier account is already connected and synced within your PickMyTrade dashboard.
11.2 Add Tradier Account to Another PickMyTrade Account
Use this configuration if you’re managing multiple PickMyTrade logins and want to execute trades in a Tradier account from a different PickMyTrade account (not the currently active one).
| Field Name | Example Input | Explanation |
| PickMyTrade Token | qwerty | Enter the unique PickMyTrade Token required for integration. |
| PickMyTrade Conn. Name | TRADIER3 | Enter the connection name associated with this PickMyTrade account. |
| RITHMIC Acc. Name | VA28198821 | Enter the Tradier account name exactly as it appears in the trading platform. |
| Option | QUANTITY MULTIPLIER / RISK PERCENTAGE | Choose QUANTITY MULTIPLIER to adjust trade sizes or RISK PERCENTAGE to manage risk per trade. |
| QUANTITY MULTIPLIER | 1 (if selected) | If a Quantity Multiplier of 2 is set, all trade sizes will be doubled.Example: If the usual trade size is 5 contracts, and a multiplier of 2 is applied, the system will place trades with 10 contracts. |
| RISK PERCENTAGE | 2% (if selected) | If a Risk Percentage of 2% is set, each trade will risk 2% of the total capital in the account.Example: With an account balance of $50,000 and a 2% risk setting, the maximum risk per trade will be $1,000. |
Make sure the PickMyTrade Token is valid and that the Tradier connection exists in the destination account, or execution will fail.
11.3 Generate Alert Code for Indicator Execution
Once all accounts are added and configured, click Confirm & Generate Alert button.
Final Step – Generate Alert and Copy to TradingView #
After generating the alert, you’ll receive a JSON payload.
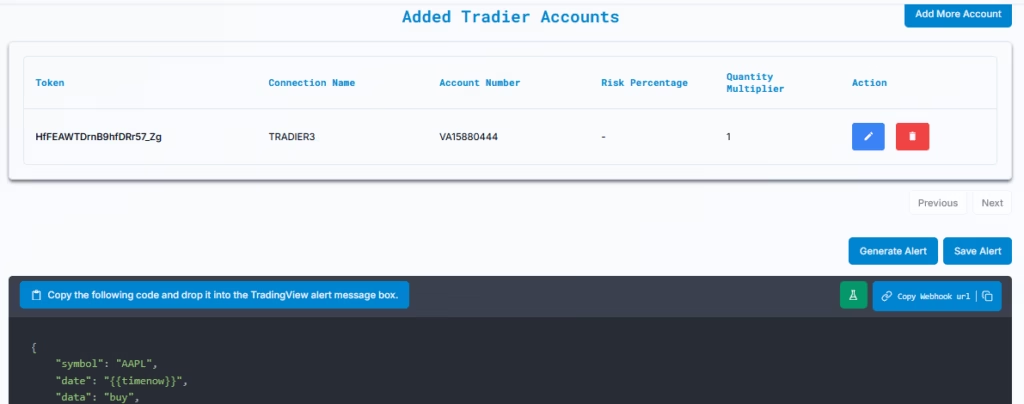
- Copy the alert message /JSON
- Open TradingView → Click “+ Create Alert”
- Paste the alert message into the Message field
- Paste the Webhook URL provided by PickMyTrade
- Set your alert condition and frequency
- Click Create Alert
You’re done! Your TradingView indicator is now connected to your Tradier account through PickMyTrade — ready for automated, real-time execution.
Next, follow the link below to learn how to set up your TradingView alert for automated trading:
Setting Up TradingView Alerts for Automated Trading
More Resources #
Want to automate trades on platforms beyond Rithmic, such as Interactive Brokers, TradeLocker, TradeStation, or ProjectX?
Explore all PickMyTrade setup guides
Using Tradovate instead?
View the Tradovate automation guide
Ready to connect Tradier?
See Tradier automation on pickmytrade.io
Last updated: September 29, 2026


