
Want to automate your TradingView strategy alerts using Match-Trader?
This guide walks you through connecting your Match-Trader account to PickMyTrade, generating alerts, and configuring Stop Loss / Take Profit automation for CFD and Forex markets.
1. Connect Your Match-Trader Account to PickMyTrade #
Before creating alerts, you must connect your Match-Trader broker account to PickMyTrade.
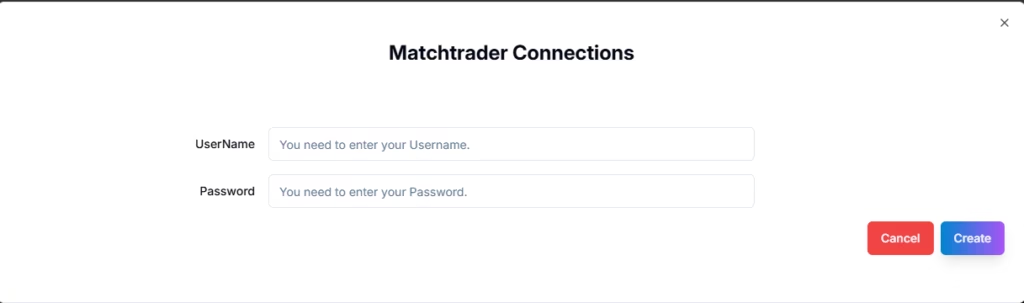
Steps:
- Choose Broker: Match-Trader
- Click Connections in the top-right of PickMyTrade
- Select Add New Connection
- Enter your credentials:
| Field | Description | Example |
|---|---|---|
| Username | Your Match-Trader login | [email protected] |
| Password / API Key | Broker credentials (as required) | ******** |
Click Save and confirm the connection status shows Active.
2. Generate the Alert in PickMyTrade #
Once Match-Trader is connected:
- Go to Generate Alert from the sidebar
- Fill in the required configuration fields
- Click Generate Alert
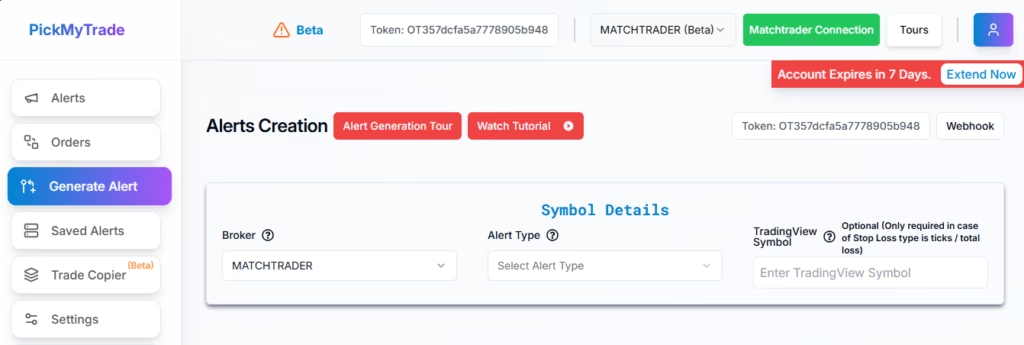
You’ll receive:
- A Webhook URL
- A JSON alert payload
These will be used in TradingView.
3. Select Match-Trader as Your Broker #
- Broker: Match-Trader
- Choose Match-Trader from the broker dropdown
4. Choose Your Alert Type #
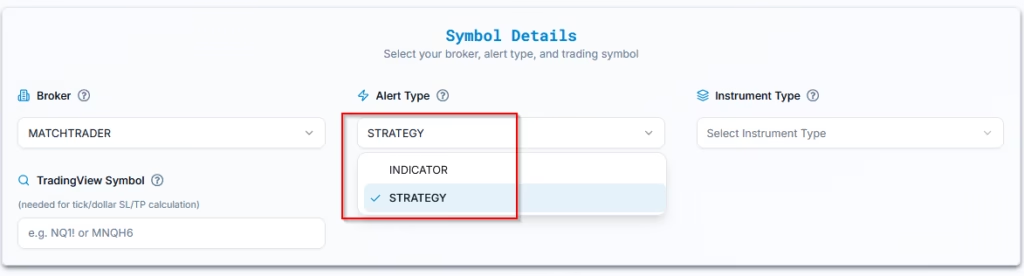
Two alert types are supported:
- INDICATOR — For TradingView indicator-based or manual alerts
- STRATEGY — For Pine Script strategies with automated execution
Example:
- Alert Type: STRATEGY
5. Select Instrument Type #
Before entering the symbol, choose the correct Instrument Type to ensure PickMyTrade applies the right execution and pricing logic.
Available options:
- CFD — Use for indices, metals, energies, and CFDs (e.g., NAS100, US30, XAUUSD).
- FOREX — Use for spot Forex pairs with standard FX contract specifications (e.g., EURUSD, GBPJPY).
- FOREXCFD — Use when your broker offers Forex pairs as CFDs instead of spot FX (common with prop firms).
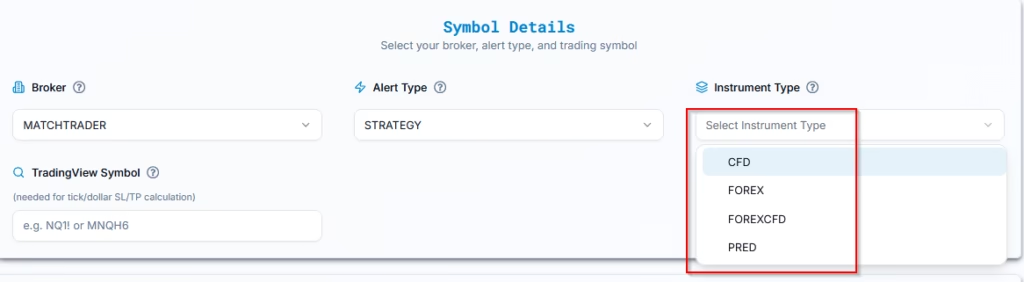
⚠️ Selecting the wrong instrument type may lead to incorrect lot sizing, SL/TP calculation, or order rejection.
6. Enter the TradingView Symbol #
Enter the TradingView symbol, and select symbol from dropdown.
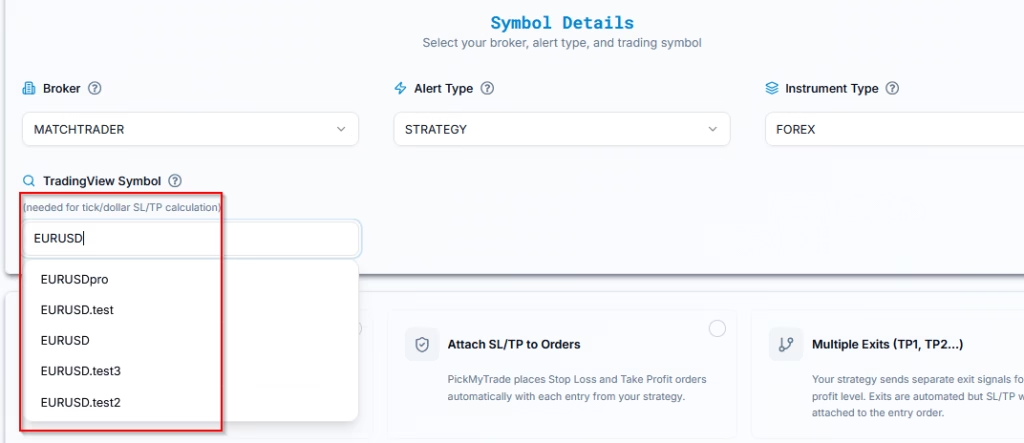
This field is mandatory when using:
- Ticks-based SL/TP
- Risk-percentage sizing
7. Confirm Exit Handling #
Determine how exits will be managed for your strategy:
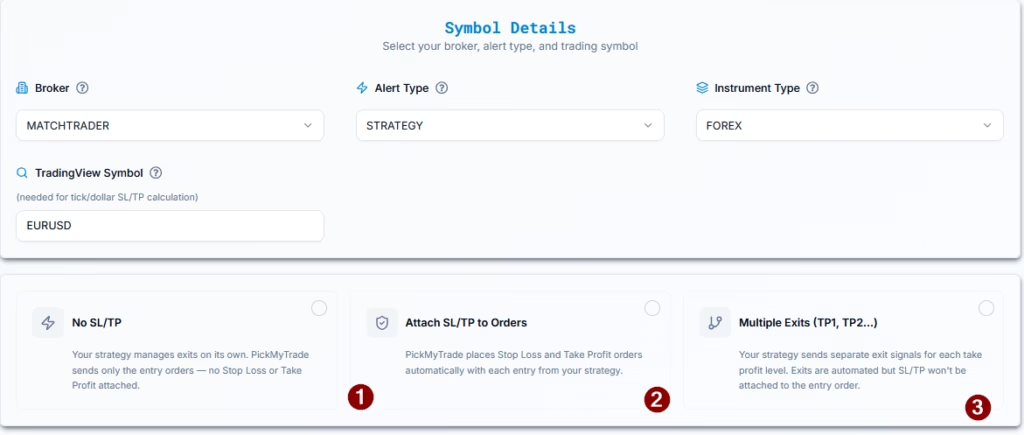
Option 1: No SL/TP (Strategy Controlled Exits) #
- Select this if your TradingView strategy fully manages entries and exits
- PickMyTrade will NOT place any Stop Loss or Take Profit orders
- All exits will be executed only when TradingView sends exit alerts
Use this when:
Your strategy already includes complete exit logic
Option 2: Attach SL/TP to Orders #
- Select this if your strategy does NOT handle exits
- PickMyTrade will place Stop Loss (SL) and Take Profit (TP) with each entry
Features:
- Choose SL/TP type (percentage, price, Total Profit/Loss, etc.)
- Only one SL and one TP per order is supported
Use this when:
You want simple, fixed risk management handled by PickMyTrade
Option 3: Multiple Exits (TP1, TP2, etc.) #
- Select this if your TradingView strategy uses multiple take-profit levels
- PickMyTrade will NOT require SL/TP configuration
- All exits will be executed based on TradingView alerts
Note:
When using multiple exits, SL/TP cannot be attached to the entry order.
8. Stop Loss & Take Profit Configuration #
If you would like to place Stop Loss and Take Profit orders in PickMyTrade with each order from your strategy.
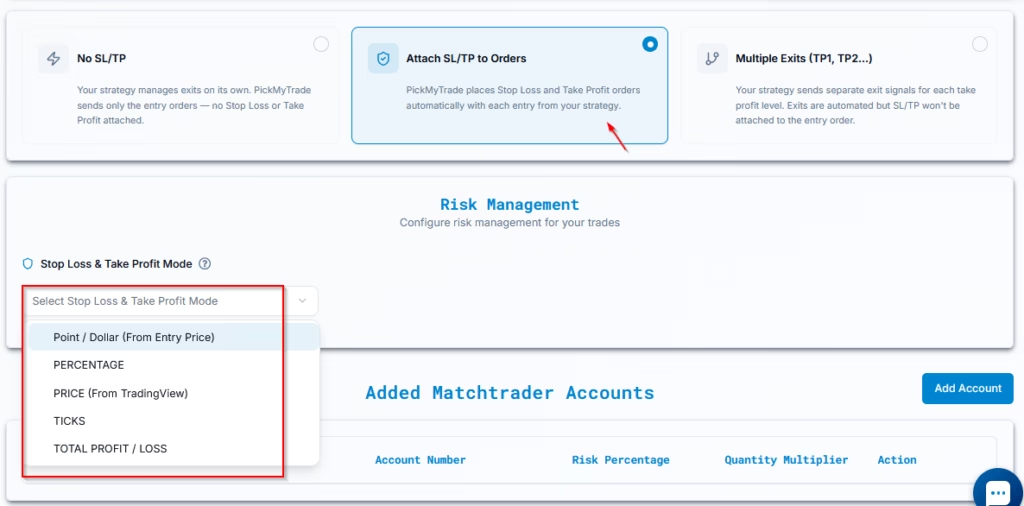
Match-Trader supports one active SL and TP per symbol. Any new alert in the same direction will overwrite existing SL/TP values.
Available SL/TP Types #
- Dollar (from Entry)
- Percentage
- Price (From TradingView)
- Ticks
- Total Profit / Loss (USD)
When configuring Stop Loss (SL) and Take Profit (TP) in automated trading, you can choose different methods to define exit levels. Each method manages risk and profits in a distinct way, depending on whether you prefer fixed values, percentages, or price-based logic. #
1. Dollar (from Entry) #
Sets SL/TP using a fixed dollar amount from the entry price. This is useful when you want precise control over monetary risk.
Example:
Entry at $21,000
- Stop Loss: $500 → exits at $20,500
- Take Profit: $1,000 → exits at $22,000
2. Percentage #
Calculates SL/TP as a percentage of the entry price, keeping risk proportional to market value.
Example:
Entry at $21,000
- Stop Loss: 2% → exits at $20,580
- Take Profit: 5% → exits at $22,050
3. Price (From TradingView) #
Defines SL/TP at exact price levels, often based on technical analysis like support and resistance.
Reference Document: TradingView Plot Placeholder Integration
Example:
Entry at $21,000
- Stop Loss: $20,800
- Take Profit: $22,200
4. Ticks #
Uses a fixed number of ticks from the entry price. Commonly used in futures markets.
Example (NQ futures):
- 1 tick = 0.25 points = $5
- Stop Loss: 20 ticks → $100 risk
- Take Profit: 40 ticks → $200 reward
5. Total Profit / Loss #
Closes the position once a predefined total profit or loss is reached, regardless of price.
Example:
Target Profit: $1,000
The trade closes as soon as either limit is hit.
Max Loss: $500
11. Match-Trader Account Management in PickMyTrade #
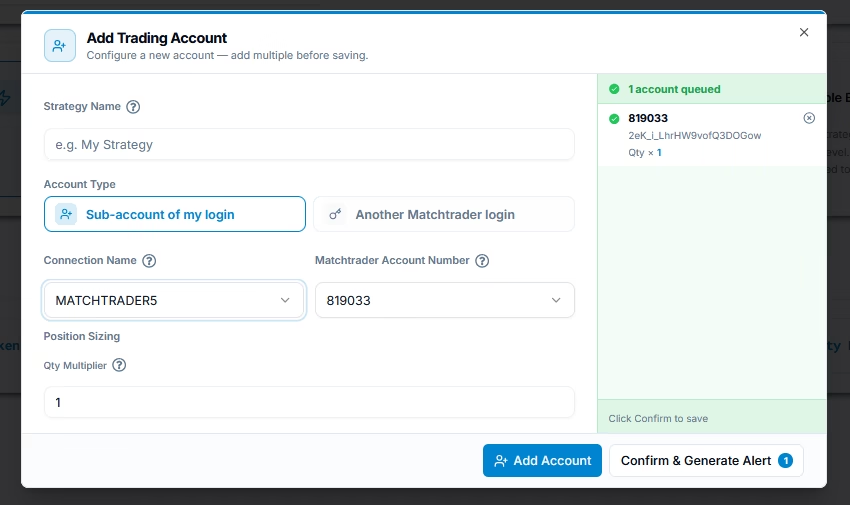
10.1 Add Match-Trader Account (Same PickMyTrade Account) #
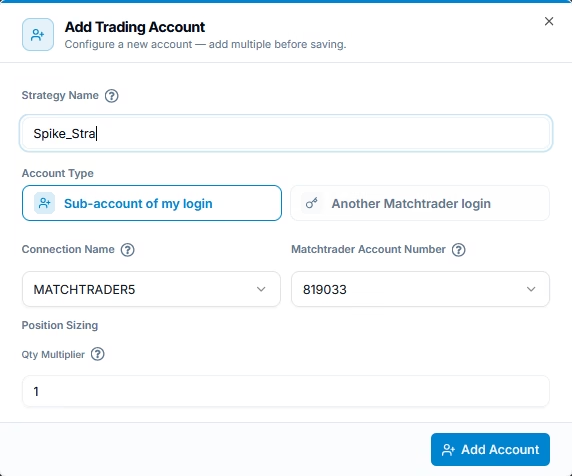
| Field | Example | Description |
| PickMyTrade Conn. Name | MATCHTRADER1 | Select your Match-Trader connection |
| Match-Trader Acc. Name | MT-ACC-001 | Choose broker account |
| Option | QUANTITYMULTIPLIER | Position sizing method |
| Qty Multiplier | 1 | 1 = same size, 2 = double |
Click Save to apply changes.
10.2 Add Match-Trader Account (Different PickMyTrade Account) #
Used when routing trades across multiple PickMyTrade accounts.
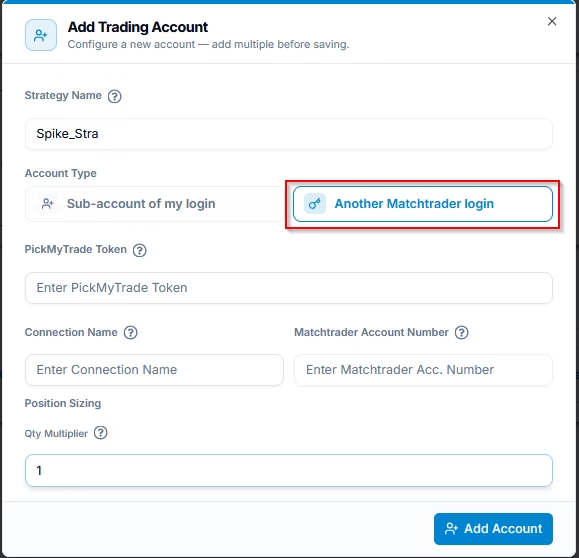
| Field | Example | Description |
| PickMyTrade Token | target_account_token | Token from destination account |
| PickMyTrade Conn. Name | MATCHTRADER1 | Must exist in target account |
| Match-Trader Acc. Name | MT-ACC-002 | Exact broker account name |
| Option | QUANTITYMULTIPLIER | Same sizing logic |
| Qty Multiplier | 1 | Trade size multiplier |
Execution will fail if the token or account mapping is incorrect.
10.3 Generate Alert Code for Strategy Execution
Once all accounts are added and configured, click Confirm & Generate Alert button.
12. Final Step – Generate & Use Your Alert #
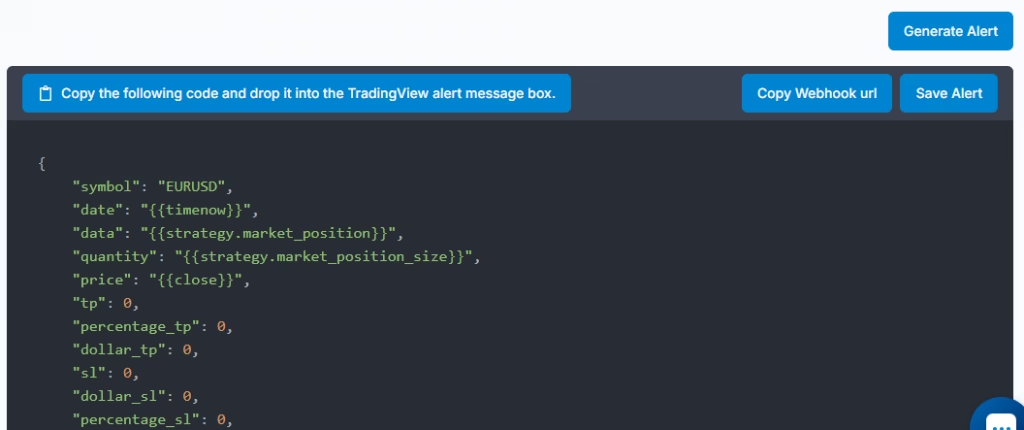
- Copy the Webhook URL and JSON payload
- Paste them into TradingView’s alert dialog
Next, follow the TradingView setup guide to complete automation with Match-Trader.
Setting Up TradingView Alerts for Automated Trading
More Resources #
Ready to connect Match-Trader?
See Match-Trader automation on pickmytrade.io
Last updated: September 29, 2026


