
This guide explains how to start automating TradingView indicator alerts in cTrader using PickMyTrade. Whether you’re trading forex, index, commodity, metal or stock, this step-by-step process ensures your signals trigger real trades with speed and precision.
Pre-requisites #
Before proceeding, ensure that your cTrader account is connected to PickMyTrade.
If you have not connected your account yet, please refer to the detailed setup guide.
Connect cTrader with PickMyTrade – Easy Setup Guide

When the connection button turns 🟢 Green, your cTrader account is successfully connected to PickMyTrade.
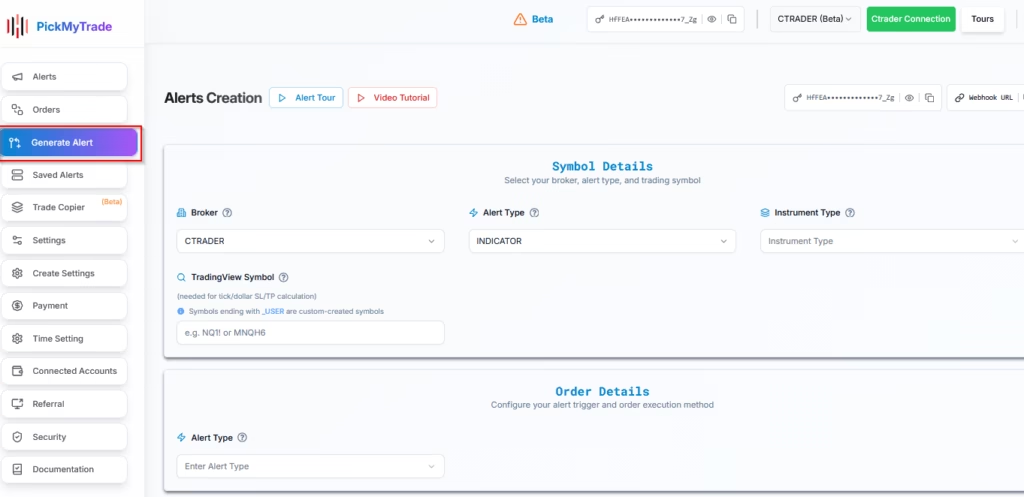
1. Generate Alert from PickMyTrade Dashboard #
Navigate to the Generate Alert option from the homepage to create trade alerts.
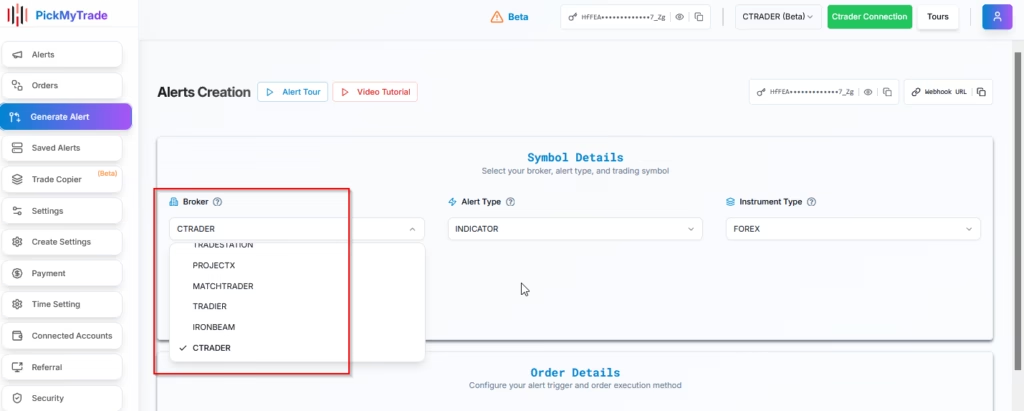
2. Select Ctrader as Your Broker for Automated Trading #
Choose Ctrader as your broker from the dropdown list.
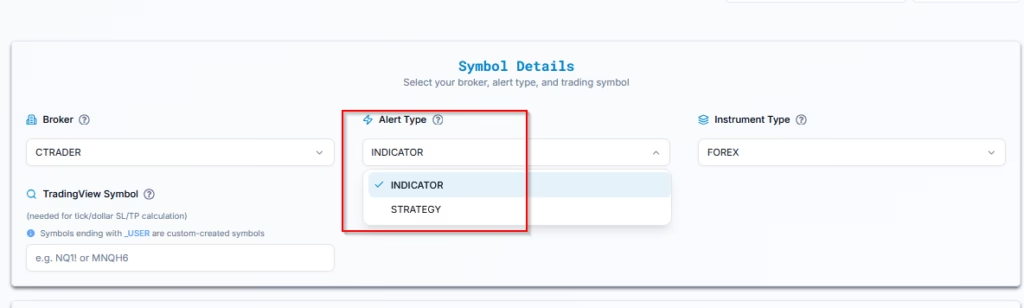
3. Configure TradingView Indicator Alerts for Automation #
Alert Type Options
| Alert Type | Description |
|---|---|
| INDICATOR | Based on any technical indicator (e.g., RSI, SuperTrend) |
| STRATEGY | Based on TradingView’s built-in or custom backtested strategies |
Select INDICATOR as the preferred alert type for this setup.
4. Select Instrument Type #
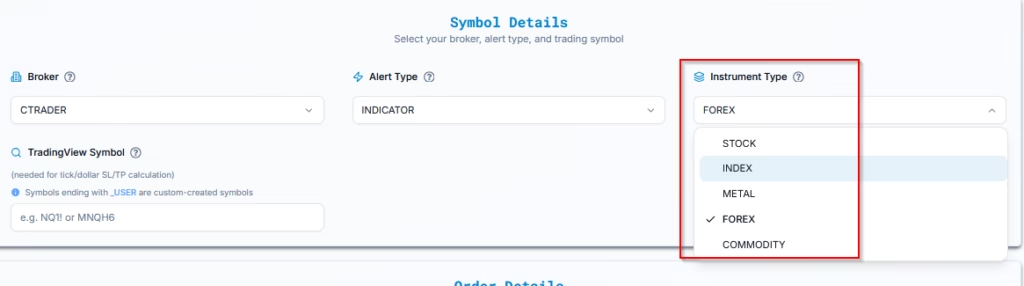
Before entering the symbol, choose the correct Instrument Type to ensure PickMyTrade applies the right execution and pricing logic.
Available options:
- FOREX — Use for spot Forex currency pairs (e.g., AUDUSD, EURJPY, GBPUSD).
- STOCK — Use for individual company shares (e.g., APPLE, FEDEX, TESLA).
- METAL — Use for precious metal instruments (e.g., XAUUSD, XAGEUR, XPTUSD).
- INDEX — Use for stock market indices (e.g., US 500, FRANCE 40, US 30, NAS 100).
- COMMODITY — Use for energy and commodity instruments (e.g., XTIUSD, XBRUSD, NATGAS).
This tells PickMyTrade how to structure the trade format (lots vs contract vs shares, etc.)
Example:
If trading EURUSD, select FOREX.
⚠️ Selecting the wrong instrument type may lead to incorrect lot sizing, SL/TP calculation, or order rejection.
5. Enter the TradingView Symbol #
Example: EURUSD
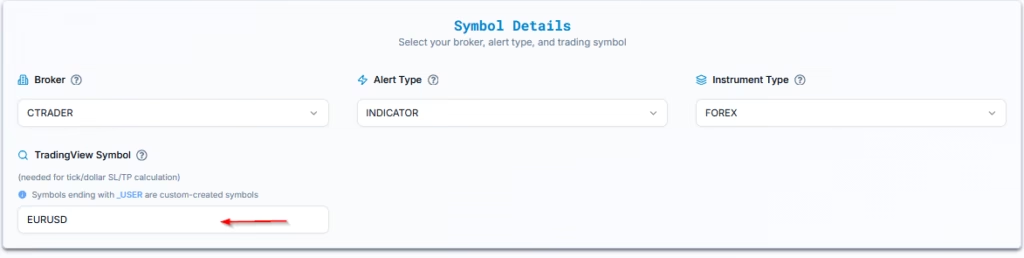
This field is mandatory when using:
- Ticks-based SL/TP
- Risk-percentage sizing
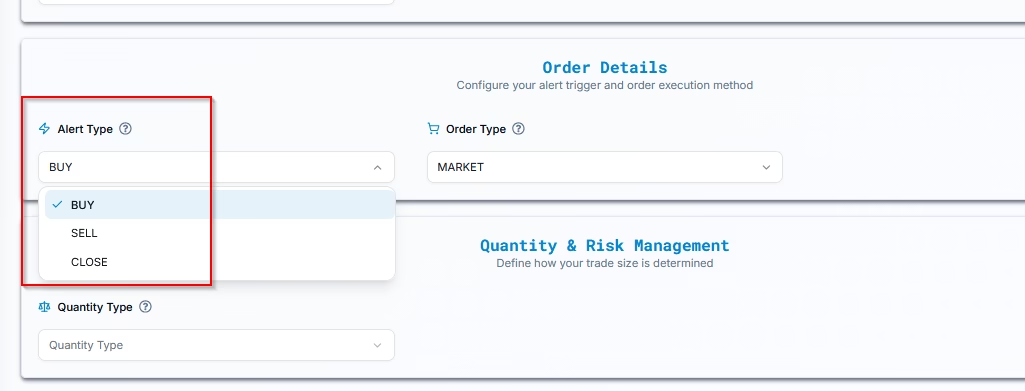
6. Configure Order Details (Trade Action) #
Select the type of trading action you want the alert to trigger:
BUY Alert #
- If no position exists, a new buy position is opened.
- If a sell position exists, it is closed first, then a buy is opened.
- Any open sell orders are canceled.
SELL Alert #
- If no position exists, a new sell position is opened.
- If a buy position exists, it is closed first, then a sell is opened.
- Any open buy orders are canceled.
CLOSE Alert #
- Closes all open positions.
- Cancels all open orders.
- Does not open a new position.
Example:
Alert Type: BUY
7. Select Order Type #
PickMyTrade allows you to choose how your order is placed on cTrader.
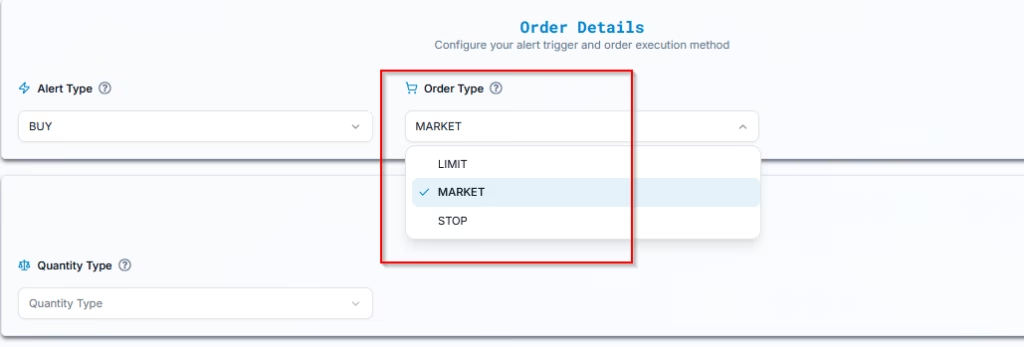
Market Order
The trade is executed immediately at the best available market price. This is recommended when fast execution is critical and you want to ensure the position is opened without delay.
Limit Order
The trade is placed at a predefined price level and will only be executed if the market reaches that price. This is useful for pullback, retracement, or level-based strategies.
Stop Order
The trade is placed only when the market reaches a specified stop price. Once that price is triggered, the stop order becomes a market order and is executed at the best available market price. This is commonly used for breakout strategies, where you want to enter a trade only after the price moves beyond a key support or resistance level.
8. Choose Fixed Quantity or Risk-Based Trade Sizing #
You have two ways to define trade size:
- Fixed Quantity – Manually specify the number of lots, contracts, shares, or units, depending on the selected instrument type.
Example: 0.5 lots of EURUSD.

- Risk Percentage –When using Risk Percentage, the system calculates your trade size so that your maximum loss equals a fixed percentage of your total account balance, based on the stop-loss distance.
Example: If you set 2% risk, the system adjusts the trade size so that your total risk is 2% of the position size relative to stop loss distance, not 2% of your full account balance.

Note: If you choose Risk Percentage, a stop loss is mandatory as it defines the trade size.
9. Stop Loss & Take Profit Configuration #

Enable SL / TP #
- YES → Enable Stop Loss / Take Profit
PickMyTrade supports five SL/TP configuration types. Select one based on your preferred method:
9.1 Point(From Entry Price)
Order Configuration
Define Stop Loss and Take Profit as point values added to or subtracted from the entry fill price.
Example — Price Movement Reference
- Entry Price: 1.1518 (EURUSD)
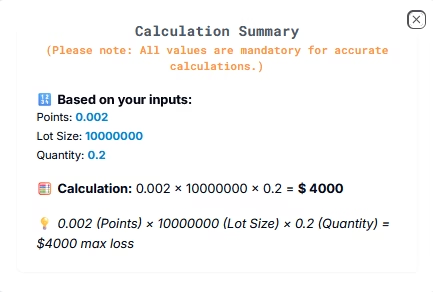
- Stop Loss Input: 0.002
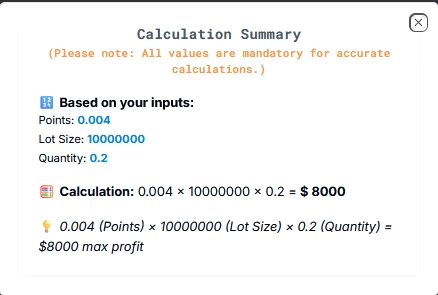
- Take Profit Input: 0.004
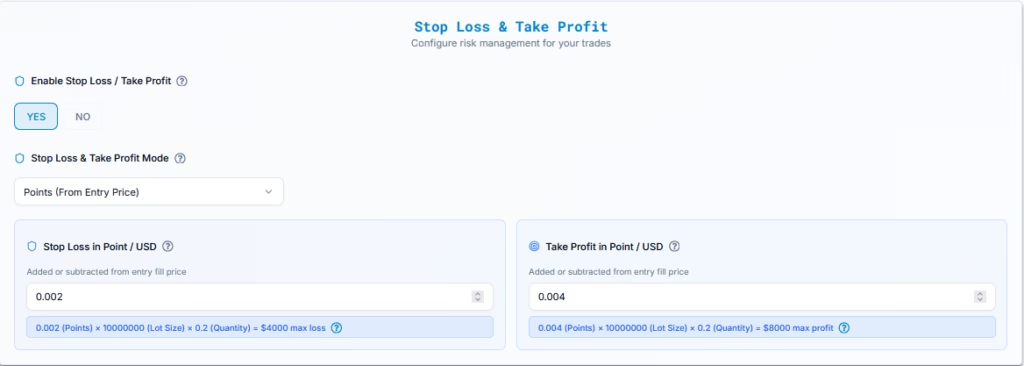
How It Works
- Stop Loss Price = 1.1594 – 0.00950 = 1.14990
- Take Profit Price = 1.1594 + 0.00350 = 1.15590
Result Calculation:
- Total Loss: Stop Loss × Lot Size × Quantity
- Total Profit: Take Profit × Lot Size × Quantity
Calculation Details
Each field (Stop Loss, Take Profit) has a small question mark (?) icon next to it.
When you click the icon, it opens a “Calculation Details” popup, showing:
- The Formula used
- The Values Entered by the user
- The Final Calculation result
- Total Loss: Stop Loss × Lot Size × Quantity
Total Profit: Take Profit × Lot Size × Quantity
9.2 Percentage
Order Configuration
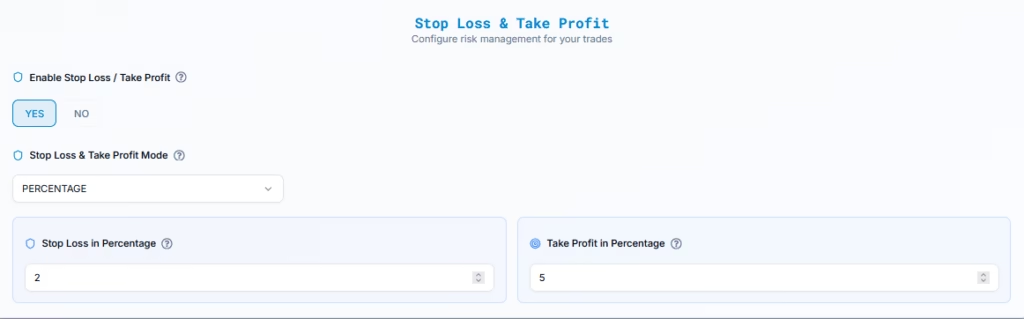
You define SL and TP as a percentage of the entry price.
- Stop Loss: 2%
- Take Profit: 5%
How It Works
Entry Price = 1.15197
Take Profit Amount = 1.20939 − 1.15197 = 0.05742
Take Profit Price = 1.15197 + 0.05742 = 1.20939
Stop Loss Amount = 1.15197 − 1.12876 = 0.02321
Stop Loss Price = 1.15197 − 0.02321 = 1.12876
Result Calculation
For 0.2 lots:
Total Loss = $464.20
Total Profit = $1,148.40
9.3 Price (From TradingView)
Order Configuration
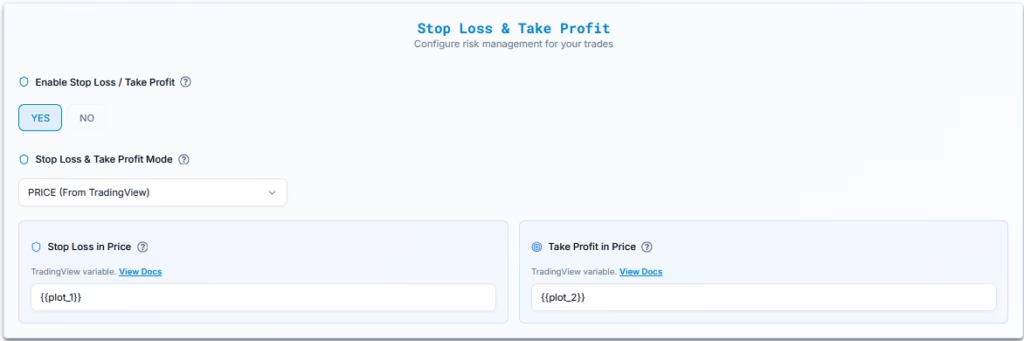
Instead of static prices, use TradingView’s dynamic variables like:
- Stop Loss:
{{plot_1}} - Take Profit:
{{plot_2}}
How It Works
When the alert is triggered, PickMyTrade pulls real-time values from the indicator’s plots.
Example
At the time of alert:
{{plot_1}}= 1.20939 → SL = 1.20939{{plot_2}}= 1.12876 → TP = 1.12876
Reference Document: TradingView Plot Placeholder Integration
9.4 Ticks
Order Configuration
In this method, you define both Stop Loss (SL) and Take Profit (TP) in ticks.
Example (EURUSD):
- 1 tick = 0.00001
- Lot size = 0.2
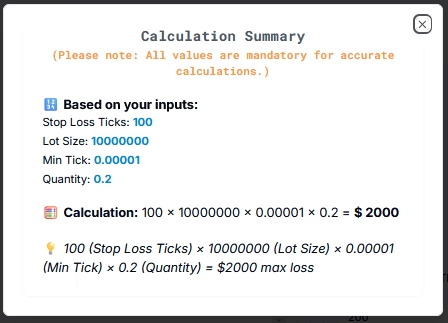
- Stop Loss: 100 ticks → $2000 risk
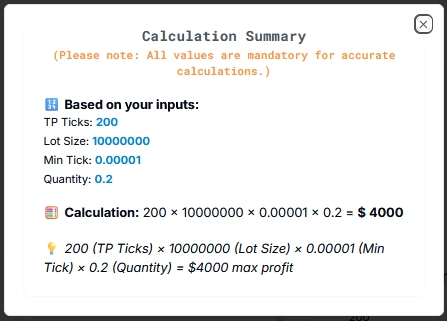
- Take Profit: 200 ticks → $4000 reward
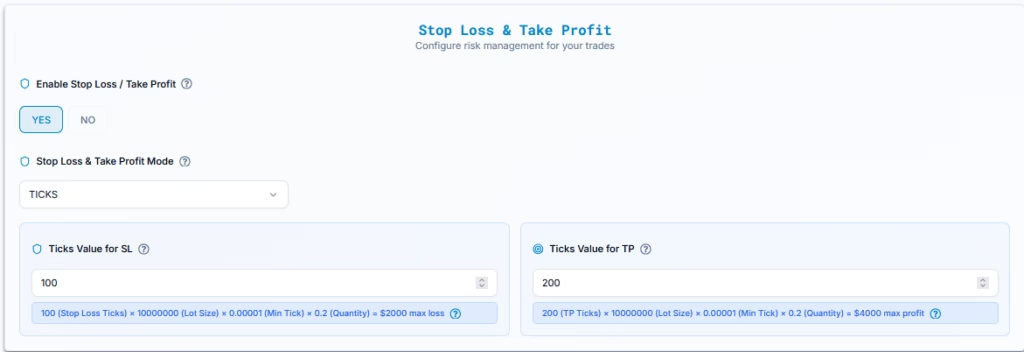
Result Calculation:
- Total Loss: Number of Ticks × Tick Value × Lot Size × Quantity
Total Profit: Number of Ticks × Tick Value × Lot Size × Quantity
9.5 Total Profit / Loss
Order Configuration
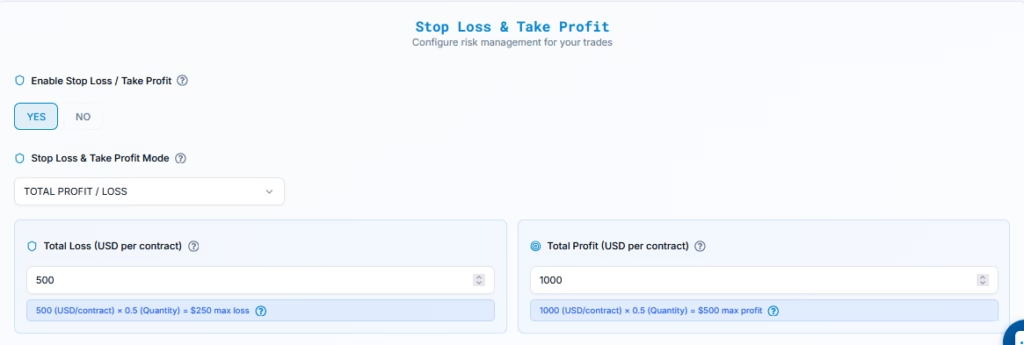
You define your Stop Loss and Take Profit in absolute USD values per unit, depending on the selected instrument type (e.g., per contract for futures, per lot for forex, or per share for stocks).
Example Configuration: #
- Stop Loss per Contract = $500
- Take Profit per Contract = $1,000
- Quantity = 0.5 lots
How It Works: #
- Total Loss = $500 × 0.5 = $250
- Total Profit = $1,000 × 0.5 = $500
10. Account Selection for Ctrader Execution #
This section explains how to add your Ctrader account to PickMyTrade for automated execution. You can either connect your Ctrader login within your current PickMyTrade account or link it across multiple PickMyTrade accounts.
10.1 Adding a Ctrader Account in Your Current PickMyTrade Login
Use this option if your Ctrader login is already connected to the same PickMyTrade account you’re currently using.
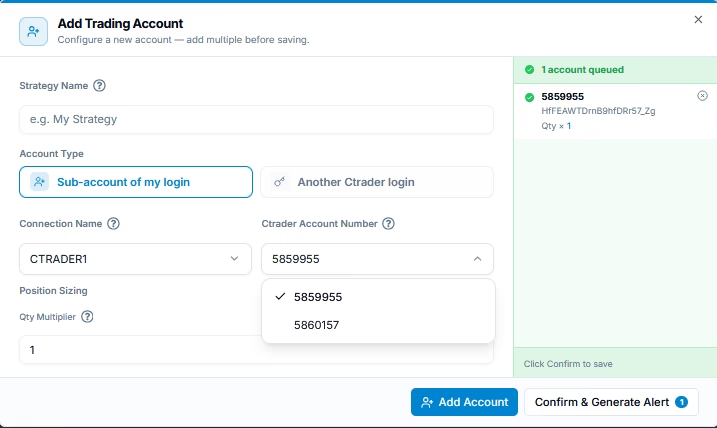
| Field Name | Example Input | Description |
|---|---|---|
| PickMyTrade Conn. Name | Ctrader | The Ctrader connection name from your PickMyTrade account |
| Ctrader Acc. Name | 5859955 | The actual Ctrader account where trades should be sent |
| Option | Quantity Multiplier /Risk Percentage | Choose how trade size is calculated |
| Quantity Multiplier | 1 | If set to 2, all trade sizes will be doubled |
| RISK PERCENTAGE | 2% | Automatically calculates position size based on a percentage of account capital. For example, 2% of a $50,000 account = $1,000 max risk per trade. |
Make sure your Ctrader connection is active and verified in the account.
10.2 Adding a Ctrader Account from Another PickMyTrade Login
Use this setup if you want to send trades into a different PickMyTrade account — useful when managing multiple logins
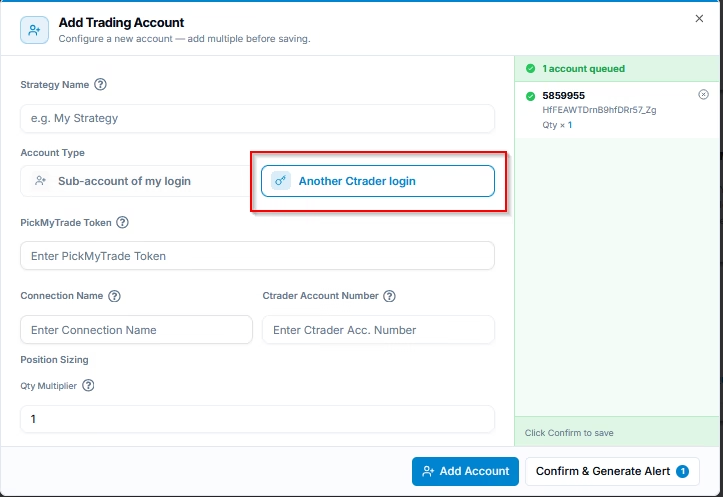
| Field Name | Example Input | Description |
|---|---|---|
| PickMyTrade Token | abcd1234xyz | Token from the external PickMyTrade account you want to trade through |
| PickMyTrade Conn. Name | Ctrader | Must match the Ctrader connection inside that target account |
| Ctrader Acc. Name | 4805264 | Must match exactly as registered in Ctrader |
| Quantity Multiplier | 1 | All trade sizes are multiplied by this number |
| RISK PERCENTAGE | 2% | If a Risk Percentage of 2% is set, each trade will risk 2% of the total capital in the account. Example: With an account balance of $50,000 and a 2% risk setting, the maximum risk per trade will be $1,000. |
Ensure the PickMyTrade token is copied accurately and the Ctrader connection exists in the destination account. Execution will fail if the mapping is incorrect.
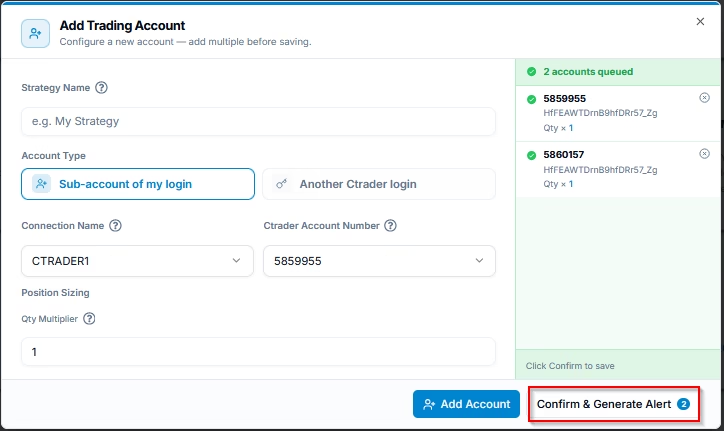
10.3 Generate Alert Code for Indicator Execution
Once all accounts are added and configured, click Confirm & Generate Alert button.
Final Step – Generate Alert and Copy to TradingView #
After generating the alert, you’ll receive a JSON payload.
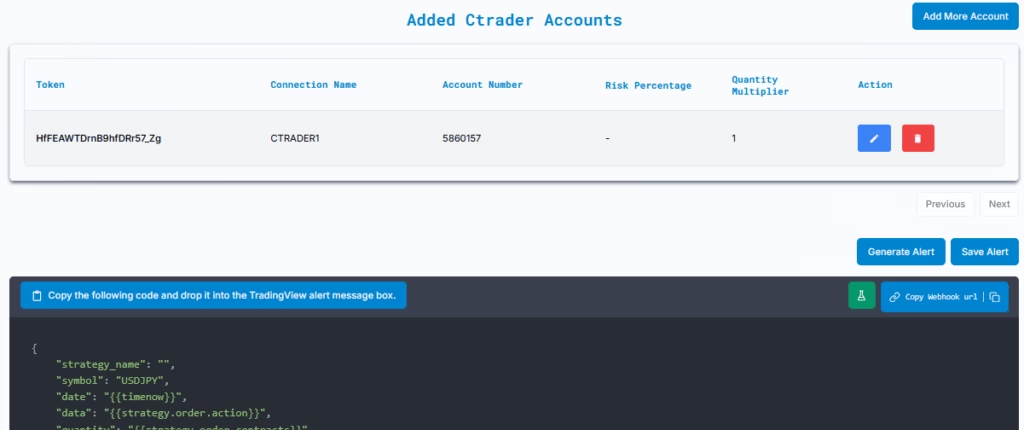
- Copy the alert message /JSON
- Open TradingView → Click “+ Create Alert”
- Paste the alert message into the Message field
- Paste the Webhook URL provided by PickMyTrade
- Set your alert condition and frequency
- Click Create Alert
You’re done! Your TradingView indicator is now connected to your Ctrader account through PickMyTrade — ready for automated, real-time execution.
Next, follow the link below to learn how to set up your TradingView alert for automated trading:
Setting Up TradingView Alerts for Automated Trading
More Resources #
Want to automate trades on platforms beyond Rithmic, such as Interactive Brokers, TradeLocker, TradeStation, or ProjectX?
Explore all PickMyTrade setup guides
Using Tradovate instead?
View the Tradovate automation guide
Ready to connect cTrader?
See cTrader automation on pickmytrade.io
Last updated: September 29, 2026


