This guide explains the complete process for automating TradingView indicator alerts in TradeStation using PickMyTrade. Whether you’re trading stocks or futures, this method ensures your alerts trigger live orders seamlessly.
1. Connect Your TradeStation Account #
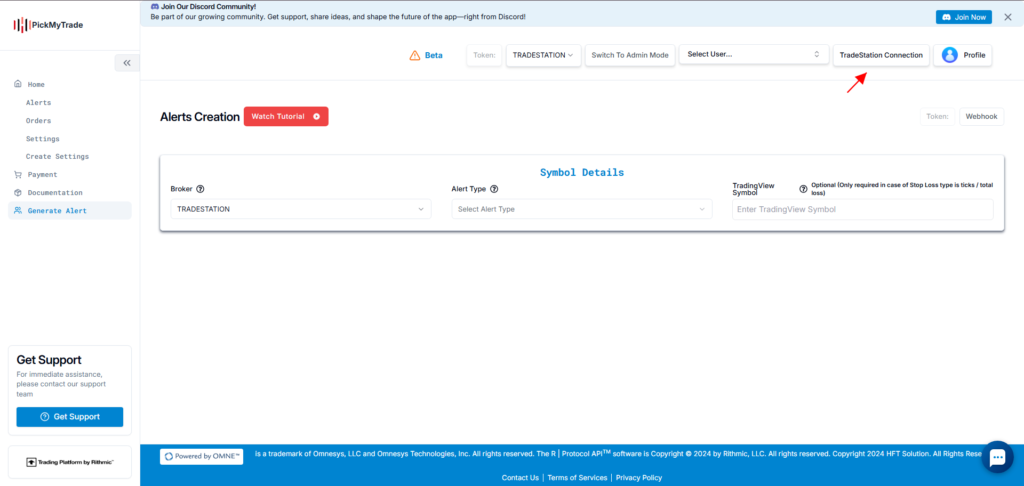
Before setting up alerts, connect your TradeStation account to PickMyTrade.
Steps: #
- Click the TradeStation Connection button in the top right corner of PickMyTrade.
- Enter the following details:
| Field | Description |
|---|---|
| TradeStation Username | Enter your TradeStation login ID |
| Environment | Select Sim (simulation) or Live |
Ensure the correct environment is selected to avoid misrouting live trades.

2. Generate Alerts for TradingView Automation in TradeStation #
Once your TradeStation account is connected:
- Navigate to Generate Alert in the sidebar.
- Fill out the required configuration fields (see below).
- Click Generate Alert to receive your webhook message and URL.
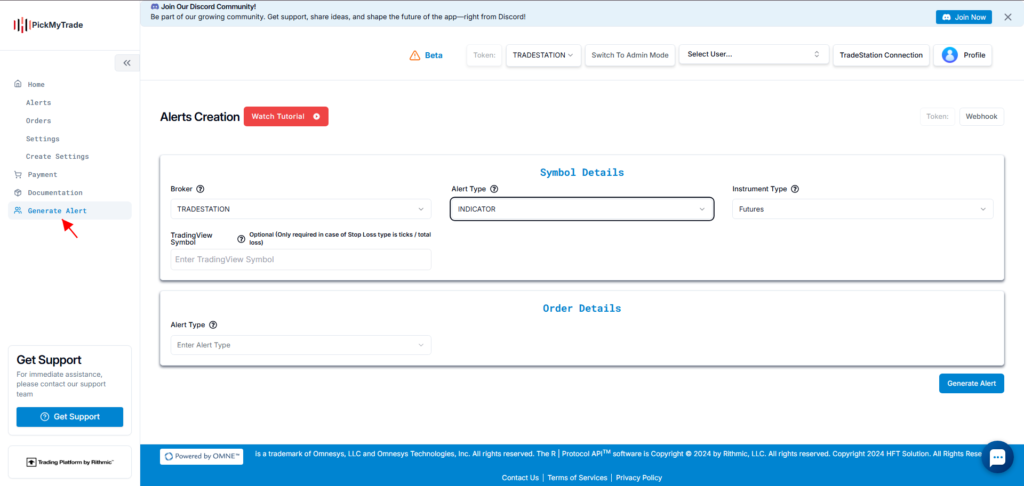
3. Select TradeStation as Your Broker #
- Broker: TRADESTATION
Select TradeStation from the broker dropdown list.

4. Choose Alert Type for TradingView Indicators #
Two alert types are available:
- INDICATOR — Use this if you are triggering alerts manually or based on TradingView chart indicators.
- STRATEGY — Use only if you’re automating a Pine Script strategy.
Example:
- Alert Type: INDICATOR

5. Instrument Type #
Select the appropriate instrument type:
- Futures
- Stock
- Options
Example:
If trading MNQZ5 (Micro Nasdaq Futures), select Futures.

6. Enter TradingView Symbol for TradeStation Alerts #
Enter the TradingView symbol (e.g., MNQZ5).

This field is optional unless you’re using stop-loss types like:
- Ticks
- Total Profit / Loss (USD)
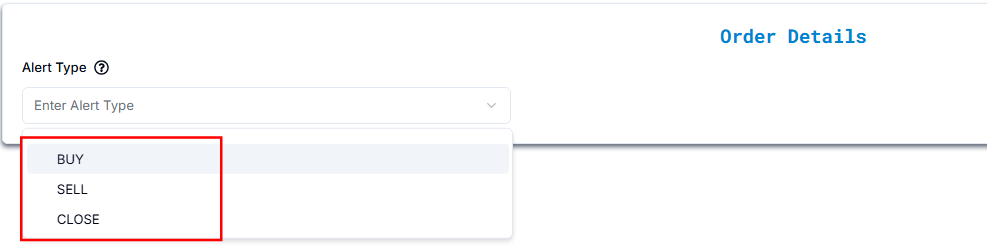
7. Order Type and Alert Behavior #
Buy Alert #
If already in a Buy Position:
Triggering a new Buy Alert will add to the current buy position.
If in a Sell Position:
The system will first close the sell position, cancel all open sell orders, then open a new buy position.
All open sell orders will be canceled when a Buy Alert is triggered.
Sell Alert #
If already in a Sell Position:
Triggering a new Sell Alert will add to the current sell position.
If in a Buy Position:
The system will first close the buy position, cancel all open buy orders, then open a new sell position.
All open buy orders will be canceled when a Sell Alert is triggered.
Close Alert #
The system will close all open positions and cancel all open orders.
It will not open any new positions.
Example Configuration:
- Alert Type: BUY
8. Quantity and Risk Settings #
Option A: Quantity #
- Quantity Type: QUANTITY
- Quantity Value: 1
Defines a fixed number of contracts for each trade.

Option B: Risk Percentage #
- Quantity Type: RISK PERCENTAGE
- Value: e.g., 2%
When using Risk Percentage, the system calculates your trade size so that your maximum loss equals a fixed percentage of your total account balance, based on the stop-loss distance.

9. Configure Stop Loss & Take Profit #
When you’re automating TradingView indicator alerts in TradeStation, proper risk management through Stop Loss and Take Profit is essential.
- Enable Stop Loss / Take Profit: YES

- Type:
- Point / Dollar (From Entry Price)
- Percentage
- Price
- Ticks
- Total Loss / Profit (USD)
1. Point / Dollar (From Entry Price) #
Define Stop Loss and Take Profit as fixed dollar values added to or subtracted from the entry fill price.
Example — Price Movement Reference #
- Entry Price: 21,680 (MNQZ5)
- Stop Loss Input: 100
- Take Profit Input: 200

Resulting Price Levels:
- Stop Loss Price = 21,680 − 100 = 21,580
- Take Profit Price = 21,680 + 200 = 21,880
These price levels determine when your SL/TP orders will trigger.
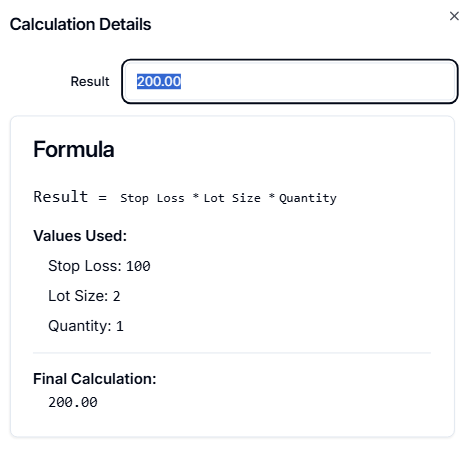
Example — Risk/Reward Calculation #
To calculate the actual dollar risk or profit per trade, use the formula below.
Formula:Result = Value × Lot Size × Quantity
Stop Loss Calculation:
- Stop Loss (Points): 100
- Lot Size: 2
- Quantity: 1
Result:
100 × 2 × 1 = $200.00
Take Profit Calculation:
- Take Profit (Points): 200
- Lot Size: 2
- Quantity: 1
Result:
200 × 2 × 1 = $400.00
2. Percentage #
Define Stop Loss and Take Profit as a percentage change from the entry price. This method adjusts SL/TP dynamically as the entry price changes, making it ideal for percentage-based risk management.
Example — Price Level Calculation #
- Entry Price Of MNQZ5: 21,680
- Stop Loss Input: 2%
- Take Profit Input: 4%

Calculated Price Levels:
- Stop Loss Price = 21,680 − (21,680 × 0.02) = 21,246.40
- Take Profit Price = 21,680 + (21,680 × 0.04) = 22,547.20
Example — Risk/Reward Calculation #
To calculate total dollar risk or profit using percentage input:
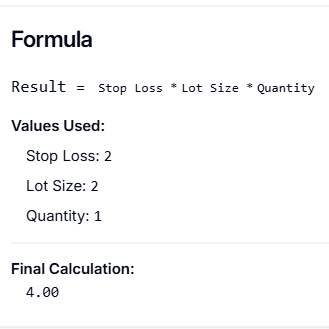
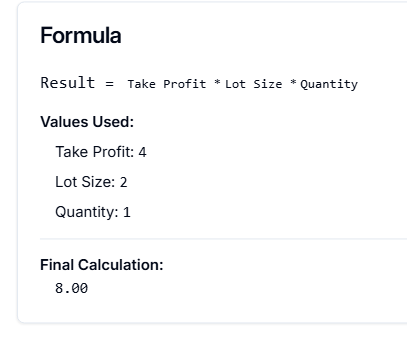
Formula:Result = Percentage × Lot Size × Quantity
Stop Loss Calculation:
- Stop Loss (%): 2
- Lot Size: 2
- Quantity: 1
Result:
2 × 2 × 1 = $4.00
Take Profit Calculation:
- Take Profit (%): 4
- Lot Size: 2
- Quantity: 1
Result:
4 × 2 × 1 = $8.00
3. Price (From TradingView Plot) #
Use values directly from TradingView plots or variables like {{plot_0}}, {{plot_1}}, etc.
- Stop Loss Input:
{{plot_1}} - Take Profit Input:
{{plot_0}}
9.3.5 Understanding {{plot_x}} Variables in TradingView #
In TradingView, placeholders like {{plot_0}}, {{plot_1}}, {{plot_2}}, etc., are automatically generated when you create an alert based on an indicator. These represent different values plotted by the indicator on your chart.
Placeholder Reference: #
{{plot_0}}— The first plotted value from the indicator{{plot_1}}— The second plotted value{{plot_2}}— The third, and so on
How They Work for Stop Loss & Take Profit #
Let’s say your custom indicator plots two key levels:
- A Stop Loss level
- A Take Profit level
In that case:
- Stop Loss might be represented as
{{plot_1}} - Take Profit might be represented as
{{plot_2}}
These placeholders allow you to send dynamic values with each alert — no need to manually hard-code prices like 21,691.
Example Setup — Using MNQZ5 #
Let’s assume:
- Symbol: MNQZ5
- Entry Price: 21,680
Your indicator is configured to plot the following:
- Stop Loss Level = 21,591
- Take Profit Level = 21,891
These will map as:
{{plot_1}}= 21,591 (Stop Loss){{plot_2}}= 21,891 (Take Profit)
Alert Message Example in TradingView: #
Stop Loss: {{plot_1}}, Take Profit: {{plot_2}}Actual Message Received When Triggered: #
Stop Loss: 21,591, Take Profit: 21,891
Important Notes #
- The first plotted value in your indicator will always be
{{plot_0}}. - The second plotted line becomes
{{plot_1}}, the third{{plot_2}}, and so on — based on the order in your Pine Script.
Make sure your TradingView indicator has clear and correctly ordered plot() functions if you’re relying on this structure for automated SL/TP placement via PickMyTrade.ur indicator will always be accessible as {{plot_0}}.
4. Ticks #
When using the Ticks method for Stop Loss and Take Profit, you define the distance from the entry price in ticks instead of fixed price levels or percentages. This is especially relevant in futures trading, where tick size and tick value are standardized per instrument.
To use this method correctly, make sure:
- The symbol is specified
- The tick size and lot size are properly configured
Example Configuration #
- Symbol: MNQZ5 (Micro Nasdaq Futures)
- Entry Price: 21,680
- Tick Size: 0.25
- Lot Size: 2
- Quantity: 1
- Stop Loss Ticks: 500
- Take Profit Ticks: 1000

Price Level Calculation #
Step 1: Convert Ticks to Points
- Stop Loss in Points = 500 × 0.25 = 125 points
- Take Profit in Points = 1000 × 0.25 = 250 points
Step 2: Calculate SL and TP Price Levels
- Stop Loss Price = 21,680 − 125 = 21,555
- Take Profit Price = 21,680 + 250 = 21,930
These levels define where your stop and target orders will be placed relative to the entry.
Dollar Value Calculation #
To estimate how much money is at risk or can be gained per trade, use this formula:
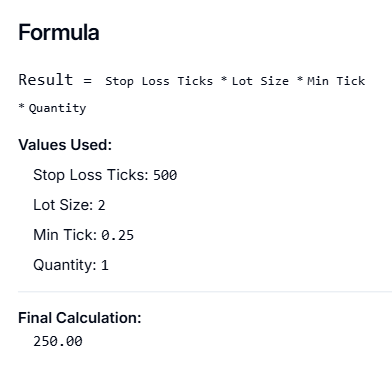
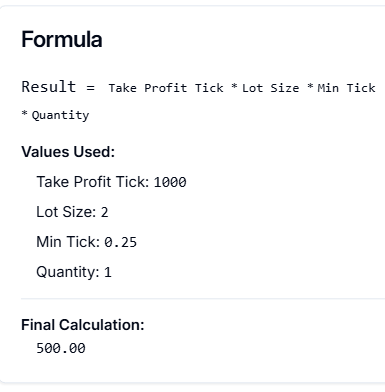
Formula:Result = Tick Count × Lot Size × Min Tick × Quantity
Stop Loss Calculation #
- Stop Loss Ticks: 500
- Lot Size: 2
- Min Tick: 0.25
- Quantity: 1
Calculation:
500 × 2 × 0.25 × 1 = $250.00
Take Profit Calculation #
- Take Profit Ticks: 1000
- Lot Size: 2
- Min Tick: 0.25
- Quantity: 1
Calculation:
1000 × 2 × 0.25 × 1 = $500.00
Summary #
Total Reward per Trade: $500.00
Stop Loss Price: 21,555
Take Profit Price: 21,930
Total Risk per Trade: $250.00
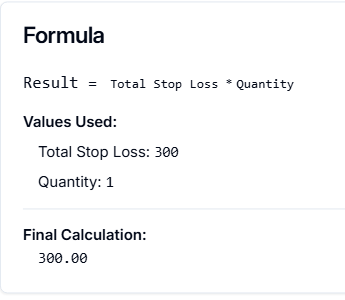
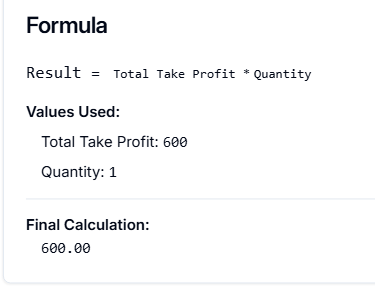
9.5 Total Profit / Loss (USD) #
Order Configuration #
This method allows you to define Stop Loss and Take Profit as fixed dollar values per contract, regardless of price or tick movement.
Example Configuration: #
- Stop Loss per Contract: $300
- Take Profit per Contract: $600
- Quantity: 1 contract

How It Works: #
- Total Loss = $300 × 1 = $300
- Total Profit = $600 × 1 = $600
Once the loss or profit reaches the defined USD threshold per contract, the position is closed.
Point Movement for Reference (Optional) #
Assuming:
- The asset moves $1 per point
- Entry Price of MNQZ5: 21,680
Then:
- SL in Points = $300 ÷ $1 = 300 points
- TP in Points = $600 ÷ $1 = 600 points
- Stop Loss Price = 21,680 − 300 = 21,380
- Take Profit Price = 21,680 + 600 = 22,280
10. Connect and Manage TradeStation Accounts #
This section explains how to add your TradeStation account to PickMyTrade for automated execution. You can either connect your TradeStation login within your current PickMyTrade account or link it across multiple PickMyTrade accounts.
11.1 Add TradeStation Account in Current PickMyTrade Account #
Use this option if your TradeStation login is already connected to the same PickMyTrade account you’re currently using.
| Field Name | Example Input | Explanation |
|---|---|---|
| PickMyTrade Conn. Name | TRADESTATION1 | Select the correct TradeStation connection name from the dropdown. |
| TRADESTATION Acc. Name | TS001928 | Choose your TradeStation account from the dropdown (must be linked). |
| Option | QUANTITY MULTIPLIER | Choose your preferred position sizing method. |
| Qty Multiplier | 1 | A multiplier of 1 sends exact quantity. 2 would double trade size, etc. |
Click Save to apply changes. Make sure your TradeStation connection is active and verified in the account.
11.2 Add TradeStation Account in Another PickMyTrade Account #
Use this setup if you want to send trades into a different PickMyTrade account — useful when managing multiple logins.
| Field Name | Example Input | Explanation |
|---|---|---|
| PickMyTrade Token | abc123xyz098 | Token from the target PickMyTrade account you want to connect to. |
| PickMyTrade Conn. Name | TRADESTATION1 | Must match the TradeStation connection name inside that target account. |
| TRADESTATION Acc. Name | TS002091 | Enter the exact TradeStation account name as shown in the TradeStation terminal. |
| Option | QUANTITY MULTIPLIER | Same sizing logic as above. |
| Qty Multiplier | 1 | Multiply trade quantity by this value (1 = unchanged, 2 = double, etc.) |
Ensure the PickMyTrade token is copied accurately and the TradeStation connection exists in the destination account. Execution will fail if the mapping is incorrect.
Final Step – Generate Alert and Copy to TradingView #
Click on “Generate Alert” #
After generating the alert, you’ll receive a JSON payload.
Next, follow the link below to learn how to set up your TradingView alert for automated trading:
Setting Up TradingView Alerts for Automated Trading
In summary, automating TradingView indicator alerts in TradeStation gives traders full control over real-time execution based on custom alerts or technical indicators from TradingView. If you’re serious about consistency in execution, automating TradingView indicator alerts in TradeStation can eliminate delays and human error completely.
More Resources #
Want to automate trades on platforms beyond Rithmic, such as Interactive Brokers, TradeLocker, TradeStation, or ProjectX?
Explore all PickMyTrade setup guides
Using Tradovate instead?
View the Tradovate automation guide


