1. Introduction #
Welcome to our comprehensive guide on how to automate futures trading with Interactive Brokers using the PickMyTrade platform. Whether you’re a beginner or an experienced trader, this step-by-step process will help you set up automated trading efficiently. From understanding futures trading basics to configuring alerts and risk management, we’ll cover everything you need to streamline your trading strategy. For a visual walkthrough, watch our accompanying video:
For a visual walkthrough, refer to the accompanying video:
2. Understanding Futures Trading Basics #
Before setting up automated trading, it’s crucial to understand key terms:
| Term | Explanation |
| Futures Contract | A standardized agreement to buy or sell an asset at a predetermined price on a future date. |
| Expiration Date | The date on which the futures contract expires and is settled. |
| Tick Size | The minimum price movement of a futures contract. |
| Leverage | The ability to control a large contract value with a smaller capital amount. |
| Margin Requirement | The minimum funds needed to maintain a futures position. |
3. Broker Selection for Futures Automation #
Available Brokers #
Steps #
- Select Interactive Brokers (IB) from the available options.
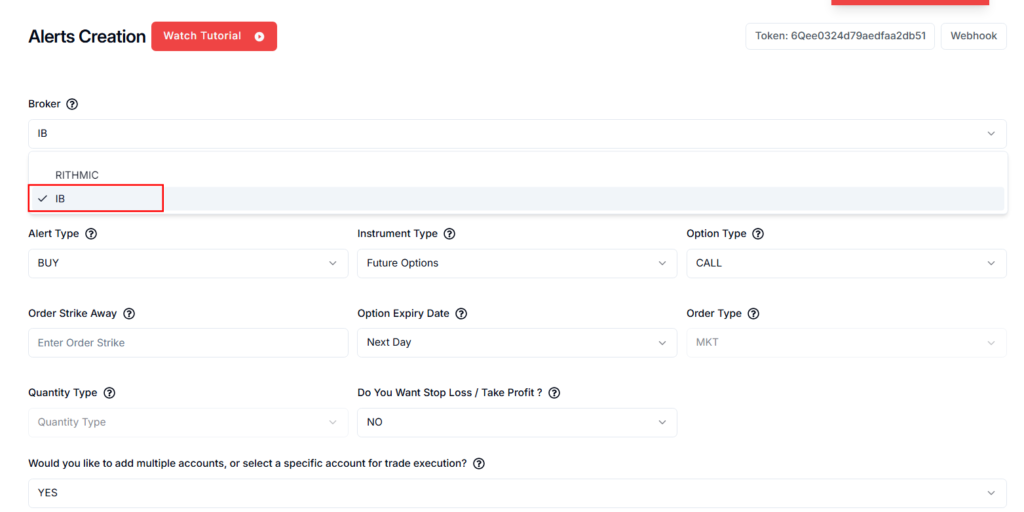
4. Configuring TradingView Alerts for IBKR #
Alert Type Options #
| Alert Type | Description |
| INDICATOR | Alerts based on technical indicators (e.g., RSI, Moving Averages). |
| STRATEGY | Alerts based on predefined trading strategies in TradingView. |
We have selected INDICATOR as our preferred alert type.

5. Choose Instrument Type:Futures, Futures Options, Options, Stocks. #
Choose Futures from the available choices: Futures, Futures Options, Options, Stocks.

6. Enter Symbol for Interactive Brokers #
Enter Trading Symbol: This is where you tell PickMyTrade which asset you want to trade (like NQ, NDX, etc.). Filling this in is optional, but it’s needed if you want PickMyTrade to calculate stop loss and take profit based on tick size or total loss.
- If the symbol doesn’t exist or isn’t mapping correctly: You’ll need to set it up first in PickMyTrade. Only after that will trades happen on that symbol.
- Want to send an alert from one symbol and trade another? You can! For example:
- You’re using NQ on your TradingView chart for the alert.
- But you want the actual trade to happen on MNQ.
- In this case, just enter MNQ in the PickMyTrade symbol field.
- What if you don’t enter a symbol here? No worries — PickMyTrade will simply take the trade based on whatever chart you’ve set up in TradingView for the alert.

7. Define Alert-Based Trade Action #
Choose the type of trade action you want to automate: #
Buy Alert:
- Cancels any open positions and open orders.
- Opens a new buy position.
Sell Alert: #
- Cancels any open positions and open orders.
- Opens a new sell position.
Close Alert: #
- Closes all open positions and open orders
- Does not open a new position.
Buy: Enters a long position when the alert is triggered.
Sell: Enters a short position when the alert is triggered.
Close: Exits an existing position when the alert is triggered. If there are no open positions or orders, it does nothing.

8. Order Type for IBKR Trade Execution #
| Order Type | Definition | Example |
| Market Order (MKT) | A market order is an order to buy or sell immediately at the current market price. | If NQ is at 21,891, and you place a market order to buy, it will execute immediately at or very close to 21,891. The order gets filled right away without waiting for any price changes. |
| Limit Order (LMT) | A limit order is an order to buy or sell only when the price reaches a specific level you set. If the price doesn’t reach that level, the order won’t be filled. | If you want to buy NQ at 21,850, you set a limit buy order. This order will not execute unless the price of NQ drops to 21,850. If the price stays above 21,850, your order won’t be filled. |
Which Order Type Should I Use? #
Order Type Decision Tree #
Do you need immediate execution?
→ Yes → Use a MARKET order
→ No → Continue below
Do you want a specific entry price?
→ Yes → Use a LIMIT order
→ No → Use a MARKET order
9. Order Configuration in PickMyTrade #
9.1 Market Order Behavior in PickMyTrade #
When choosing Market Order, the system will:
- For Buy: Buy immediately at the market price.
- For Sell: Sell immediately at the market price.
- For Close: Close the position at the market price (buy to close a short, sell to close a long).
Market orders do not use offsets.
Quantity:
Enter the number of contracts you want to trade.
(Example: NQ futures = $20 per point per contract.)
9.2 Limit Orders and Offset Logic #
When using Limit Order, two additional settings apply:
- Entry Offset Tick
- Limit to Market Wait (convert to market after timeout)
Below is only the Offset logic, as you requested.
Buy Example #
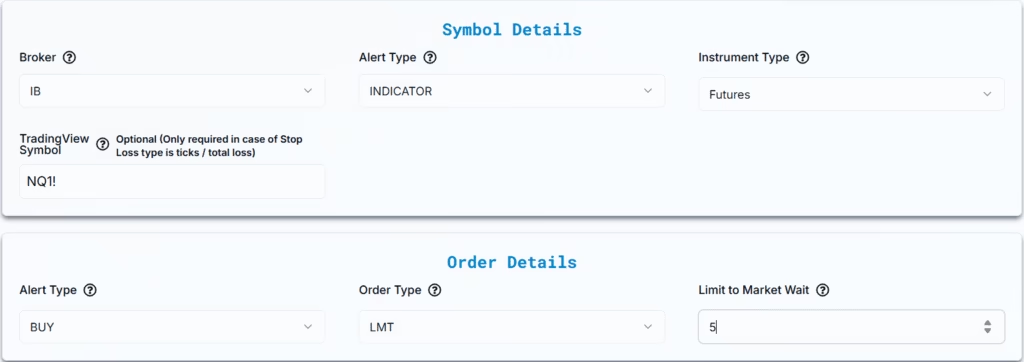
Market Price: 100
Offset: 5
A Buy with Offset 5 will look for a lower price:
Limit Buy = 100 – 5 = 95
The system waits for the price to reach 95 before executing.
Sell Example #
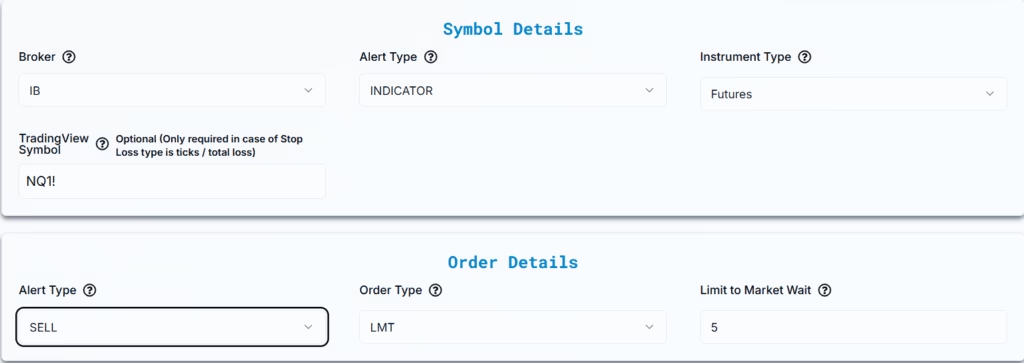
Market Price: 100
Offset: 5
A Sell with Offset 5 will look for a higher price:
Limit Sell = 100 + 5 = 105
The system waits for the price to reach 105 before executing.
Close Example #
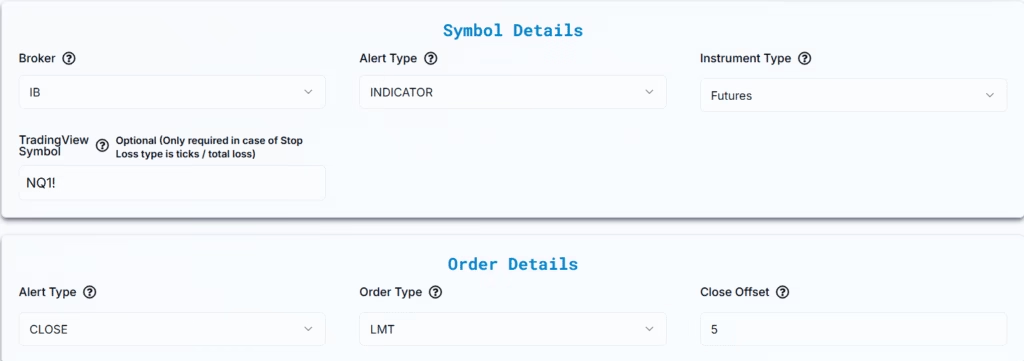
Market Price: 100
Offset: 5
Close determines direction based on the existing position:
- If the existing position is Buy (long), closing requires a Sell, so it looks for a higher price:
Limit = 100 + 5 = 105 - If the existing position is Sell (short), closing requires a Buy, so it looks for a lower price:
Limit = 100 – 5 = 95
Close automatically chooses the correct side based on the open position.
10. Market Order Configuration in PickMyTrade #
Quantity Value #
- First, enter the number of contracts you wish to trade. For example, if trading NQ futures, 1 contract = $20 per point.

11. Add Stop Loss and Take Profit to IBKR Orders #
- “Do You Want Stop Loss / Take Profit?”
- Options: YES / NO(Select YES to enable Stop Loss and Take Profit)

12. Choose Stop Loss / Take Profit Type #
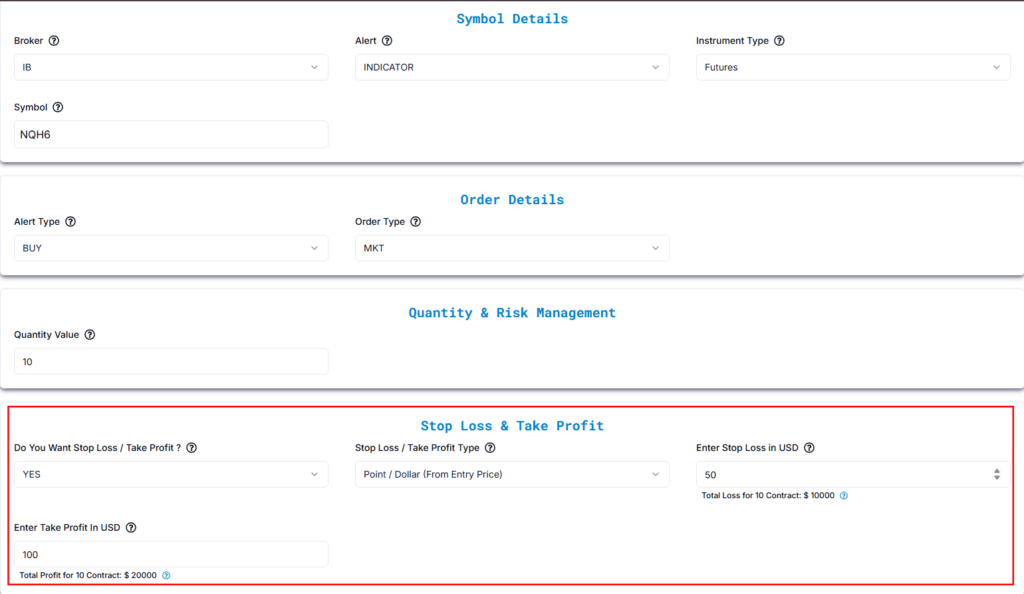
- Point / Dollar (From Entry Price)
Order Configuration:
- Stop Loss in USD: Customer manually inputs the dollar amount they are willing to risk on the trade ( in this example, we’ve chosen $50).
- Take Profit in USD: Customer manually inputs the dollar amount they aim to gain from the trade ( in this example, we’ve chosen $100).
How It Works:
- Stop Loss: The system subtracts the specified USD amount from the entry price to determine the stop loss level. The total loss may vary depending on the contract size and point value.
- Take Profit: The specified USD amount is added to the entry price to determine the take profit level.
Settings and Examples:
- Stop Loss (Point / Dollar From Entry Price):
- Setting: Enter the Stop Loss in USD. This amount determines how much you are willing to lose if the market moves against your position.
- Example: Buy NQ at 21,891 with a Stop Loss at 21,841 (50 points below entry). Total loss: 50 points × 20 (lot size) x 10 (quantity) = $10,000.
- Take Profit (Point / Dollar From Entry Price):
- Setting: Enter the Take Profit in USD. This amount sets your target gain if the market moves in your favor.
- Example: Buy NQ at 21,891 with a Take Profit at 21,991 (100 points above entry). Total profit: 100 points × 20 (lot size)x 10 (quantity) = $20,000.
Result Calculation:
- Total Loss: Stop Loss × Lot Size × Quantity
- Total Profit: Take Profit × Lot Size × Quantity
Calculation Details #
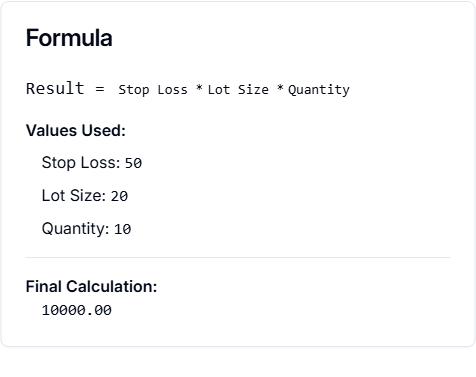
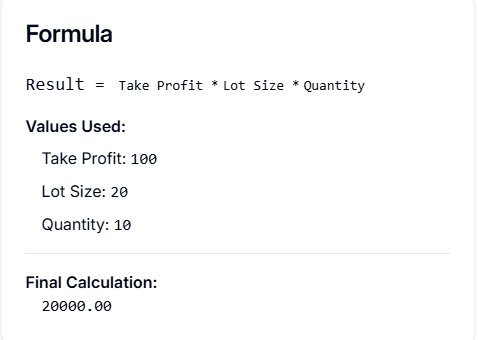
Each field (Stop Loss, Take Profit, Trail Trigger, Trail Frequency) has a small question mark (?) icon next to it.
When you click the icon, it opens a “Calculation Details” popup, showing:
- The Formula used
- The Values Entered by the user
- The Final Calculation result
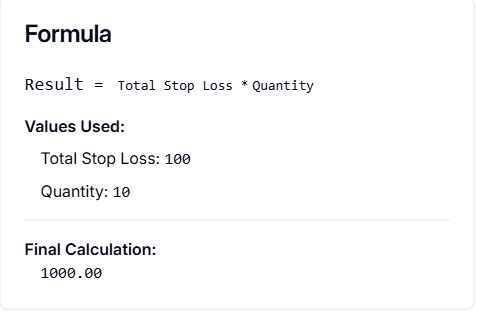
- Total Loss: Stop Loss × Lot Size × Quantity
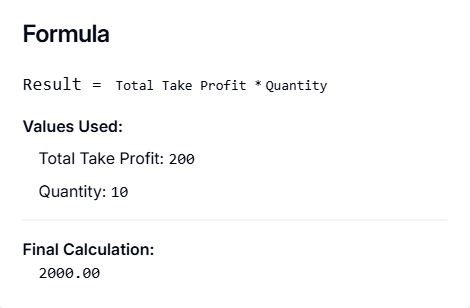
Total Profit: Take Profit × Lot Size × Quantity
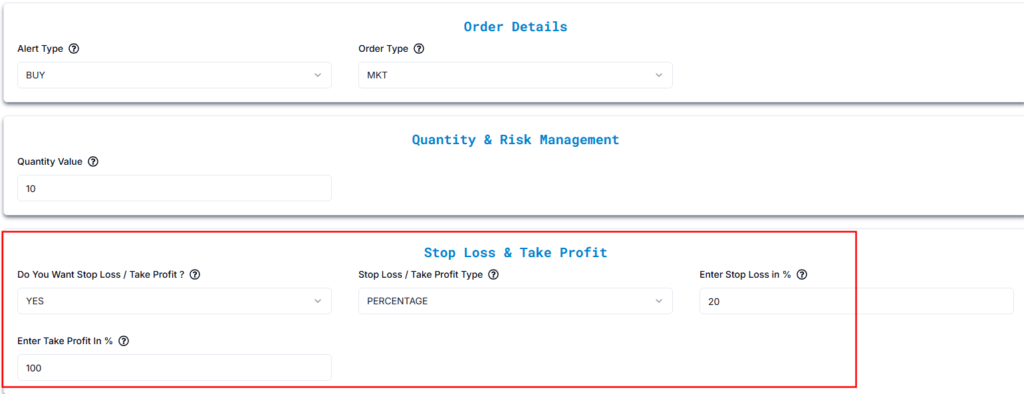
- Percentage
Order Configuration: #
- Stop Loss in %: Customer manually inputs the percentage they are willing to risk on the trade.
- Take Profit in %: Customer manually inputs the percentage they aim to gain from the trade.
How It Works: #
- Stop Loss: The specified percentage is calculated based on the entry price and subtracted to determine the stop loss level. The total loss varies depending on the entry price and lot size.
- Take Profit: The specified percentage is calculated based on the entry price and added to determine the take profit level.
Settings and Examples: #
- Stop Loss (Percentage):
- Setting: Enter the Stop Loss as a percentage of the entry price. If the market price falls by this percentage, the trade automatically closes to limit your loss.
- Example: Buy NQ at 21,891 (Entry Price)
- Stop Loss: 20% below entry price
- 20% of 21,891 = 21,891 × 0.20 = 4,378.20
- Stop Loss Price = 21,891 − 4,378.20 = 17,512.80
- Take Profit (Percentage):
- Setting: Enter the Take Profit as a percentage of the entry price. If the market price rises by this percentage, the trade automatically closes to secure your profit.
- Example: Buy NQ at 21,891 (Entry Price)
- Take Profit: 100% above entry price
- 100% of 21,891 = 21,891 × 1.00 = 21,891
- Take Profit Price = 21,891 + 21,891 = 43,782
- Price
Entry Order Details:
- Alert Type: BUY — This means you’re placing an order to purchase.
- Entry Order Type: MKT — This type of order buys the contracts at the current market price right away.
Quantity Settings:
Quantity Value: 10 — This means you’re buying 10 contracts in this trade.
Stop Loss & Take Profit Settings #
- Stop Loss / Take Profit: YES
- Stop Loss / Take Profit Type: PRICE
- Enter Stop Loss in Price(Trading View Variable) Like {{plot_}},{{plot_1}} etc.
- Example: If Stop Loss is 21,691, enter {{plot_1}} when creating the alert.
- Enter Take Profit In Price(Trading View Variable) Like {{plot_}},{{plot_1}} etc.
- Example: If Take Profit is 22,091, enter {{plot_2}} when creating the alert.
Understanding {{plot_x}} Variables in TradingView #
In TradingView, {{plot_0}}, {{plot_1}}, {{plot_2}}, etc., are placeholders that TradingView provides when you create an alert based on an indicator. These placeholders represent the different output values that the indicator shows on the chart.
- {{plot_0}} — The first value plotted by the indicator.
- {{plot_1}} — The second value plotted by the indicator.
- {{plot_2}} — The third value, and so on.
How They Work for Stop Loss & Take Profit #
Let’s say your indicator plots two important levels: #
- Stop Loss level
- Take Profit level
In this case: #
- Stop Loss will be assigned to a variable like {{plot_1}}
- Take Profit will be assigned to a variable like {{plot_2}}
When setting an alert, you don’t have to enter fixed numbers (like 21,691) manually. Instead, you just select these placeholders: #
- {{plot_1}} for Stop Loss
- {{plot_2}} for Take Profit
Example Alert Setup in TradingView #
When creating an alert, enter this in the message box: #
Stop Loss: {{plot_1}}, Take Profit: {{plot_2}} #
Example Scenario #
At the time of alert creation: #
- {{plot_1}} = 21,691 (Stop Loss)
- {{plot_2}} = 22,091 (Take Profit)
When the alert triggers, you will receive this message: #
Stop Loss: 21,691, Take Profit: 22,091 #

Important Note: #
- The first plot you add in your indicator will always be accessible as {{plot_0}}.
- The second plot becomes {{plot_1}}, the third {{plot_2}}, and so on — following the order in which they appear in the indicator’s code or settings.
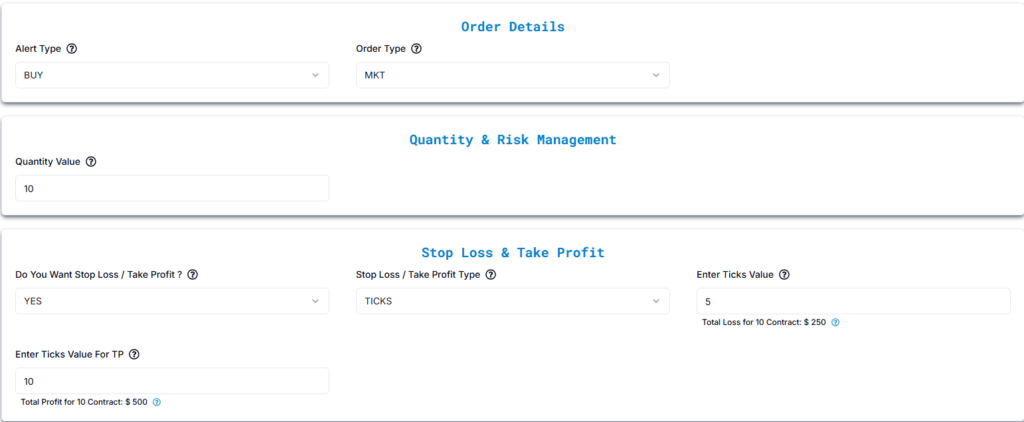
- Ticks
Order Configuration:
- Stop Loss in Ticks: Customer manually inputs the number of ticks they are willing to risk on the trade.
- Take Profit in Ticks: Customer manually inputs the number of ticks they aim to gain from the trade.
How It Works:
- Stop Loss: The specified tick value is subtracted from the entry price to determine the stop loss level. Total loss depends on tick size, number of ticks, and lot size.
- Take Profit: The specified tick value is added to the entry price to determine the take profit level.
Settings and Examples (Based on NQ Futures — Entry Price: 21,891, Tick Size: 0.25 points, $5 per tick, Lot Size: 10):
- Stop Loss (Ticks):
- Setting: Enter the Stop Loss in ticks, which defines how far below the entry price the stop loss will trigger.
- Example:
- Stop Loss: 5 ticks below entry
- 5 ticks × 0.25 points per tick = 1.25 points
- Stop Loss Price = 21,891 − 1.25 = 21,889.75
- Loss Calculation:
- Each Tick Value: $5 per contract
- Total Contracts: 10
- Total Loss per Tick: 10 × $5 = $50
- Total Loss for 5 Ticks: 5 × $50 = $250
- If the price hits 21,889.75, the total loss is $250 for 10 contracts.
- Take Profit (Ticks):
- Setting: Enter the Take Profit in ticks, which defines how far above the entry price the take profit will trigger.
- Example:
- Take Profit: 10 ticks above entry
- 10 ticks × 0.25 points per tick = 2.5 points
- Take Profit Price = 21,891 + 2.5 = 21,893.5
- Profit Calculation:
- Total Profit per Tick: $50 (10 contracts × $5 per tick)
- Total Profit for 10 Ticks: 10 × $50 = $500
- If the price hits 21,893.5, the total profit is $500 for 10 contracts.
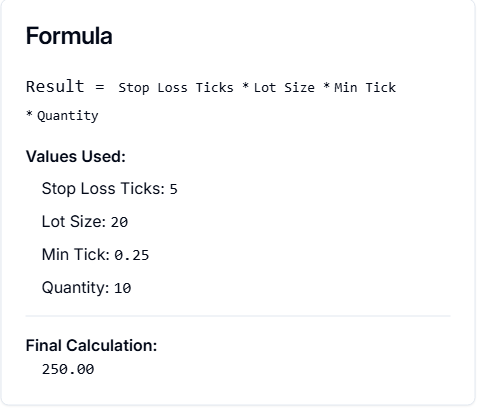
Calculation Details #
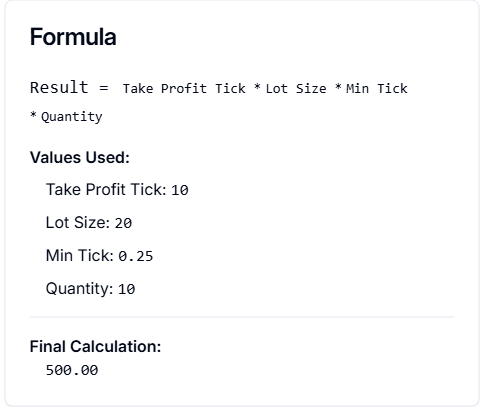
Each field (Stop Loss, Take Profit, Trail Trigger, Trail Frequency) has a small question mark (?) icon next to it.
When you click the icon, it opens a “Calculation Details” popup, showing:
- The Formula used
- The Values Entered by the user
- The Final Calculation result
Result Calculation:
- Total Loss: Number of Ticks × Tick Value × Lot Size × Quantity
Total Profit: Number of Ticks × Tick Value × Lot Size × Quantity
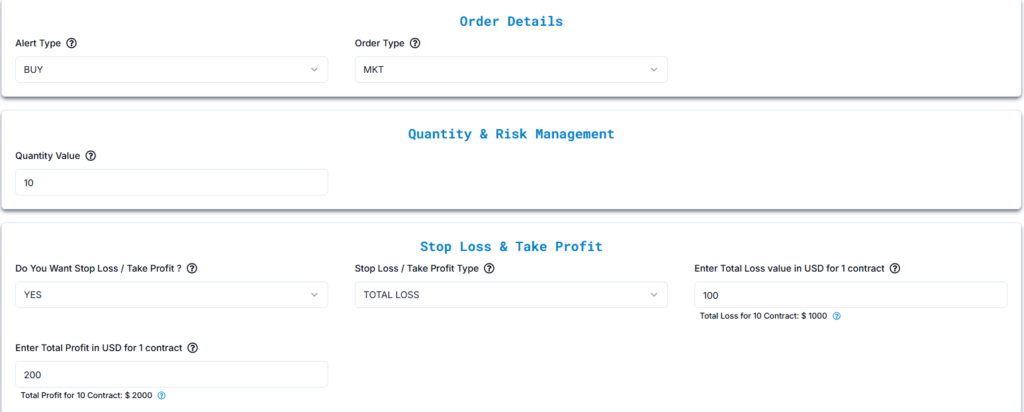
- Total Profit / Loss
Order Configuration:
- Total Loss per Contract: Customer manually inputs the total dollar amount of loss they are willing to take per contract.
- Total Profit per Contract: Customer manually inputs the total dollar amount of profit they aim for per contract.
How It Works:
- Stop Loss: The specified total loss in USD per contract is multiplied by the total number of contracts to determine the total possible loss before the position closes.
- Take Profit: The specified total profit in USD per contract is multiplied by the total number of contracts to determine the total possible gain before the position closes.
Settings and Examples (Based on NQ Futures — Entry Price: 21,891, $20 per point, Lot Size: 10):
- Total Loss (USD per Contract):
- Setting: Enter the total amount of loss in USD you’re willing to incur for one contract.
- Example:
- Total Loss: $100 per contract
- Total Contracts: 10
- Total Loss for 10 Contracts: $100 × 10 = $1,000
- Point Calculation:
- 1 point = $20 per contract
- $100 ÷ $20 = 5 points
- Stop Loss Price: Entry Price (21,891) − 5 points = 21,886
- Total Profit (USD per Contract):
- Setting: Enter the total amount of profit in USD you’re targeting for one contract.
- Example:
- Total Profit: $200 per contract
- Total Contracts: 10
- Total Profit for 10 Contracts: $200 × 10 = $2,000
- Point Calculation:
- 1 point = $20 per contract
- $200 ÷ $20 = 10 points
- Take Profit Price: Entry Price (21,891) + 10 points = 21,901
Result Calculation:
- Total Loss: Total Loss per Contract × Number of Contracts
Total Profit: Total Profit per Contract × Number of Contracts
13. Select Your Interactive Brokers Account
#
Would you like to add multiple accounts or select a specific account for trade execution?
Answer:YES (Upon selecting YES, additional configuration options become available.)

Update User Settings:
Make changes to your account here. Click “Save” when you’re done.
- PickmyTrade Connection Name: qwecfghvxs
Quantity Multiplier: 10
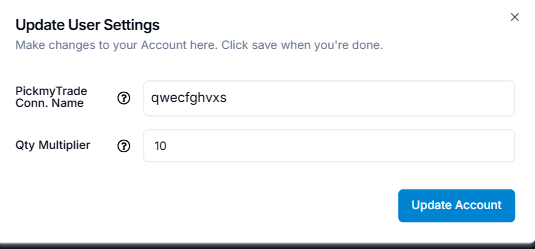
Once these values are entered, click “Generate Alert” to proceed.

Generate Alert for IBKR Automation #
Click on “Generate Alert” #
After generating the alert, you’ll receive a JSON payload (a coded message with your trade details).
Next, follow the link below to learn how to set up your TradingView alert for automated trading:
Setting Up TradingView Alerts for Automated Trading
14. JSON Parameter Explanation for Indicator Alerts #
The system generates the alert in JSON format like this:
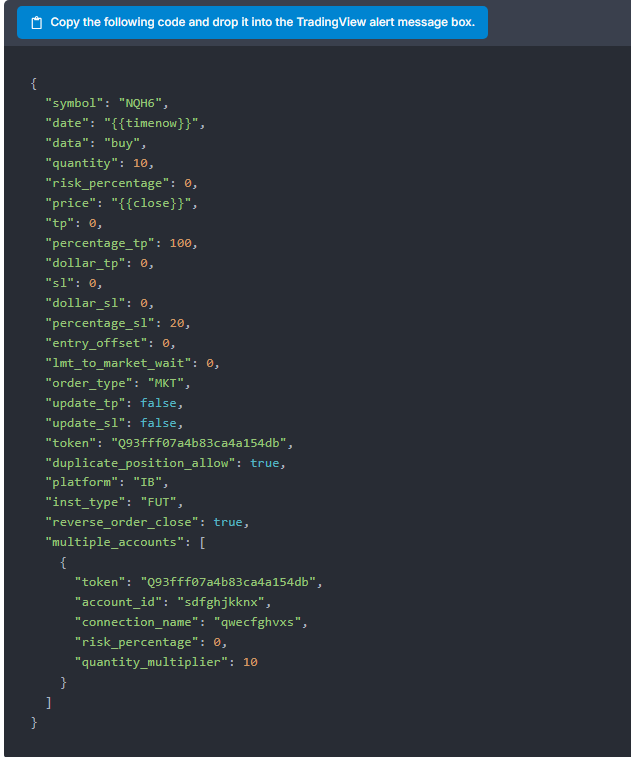
Parameter Explanation #
- symbol – Defines the trading instrument. In this case,
"NQH6"represents the Nasdaq futures contract. - date – The timestamp when the order is executed, dynamically generated by
{{timenow}}. - data – Specifies the trade action:
"buy","sell", or"close". - quantity – Determines the number of contracts or shares to be traded. Here, it is set to 10.
- risk_percentage – If set, the system calculates the trade size based on account balance and stop loss. If
0, the quantity is manually defined. - price – The execution price. If not specified, it defaults to the latest closing price (
{{close}}). - Take Profit (TP) settings:
- tp – A fixed take profit price (not set in this configuration).
- percentage_tp – Defines the take profit as 100% of the entry price.
- dollar_tp – Specifies the take profit level in dollar value (not set).
- Stop Loss (SL) settings:
- sl – A fixed stop loss price (not set).
- percentage_sl – Sets the stop loss at 20% below the entry price.
- dollar_sl – Specifies stop loss in dollar terms (not set).
- entry_offset – Adjusts order execution by a specified offset (set to
0). - lmt_to_market_wait – If using a limit order, this sets the wait time before converting it to a market order (set to
0). - order_type – Defines the type of order execution:
"MKT"for Market Order (executes at the best available price). - update_tp – If
false, a new take profit order is created instead of modifying an existing one. - update_sl – If
false, a new stop loss order is created instead of modifying an existing one. - token – The API authentication token that allows TradingView to communicate with the brokerage platform.
- duplicate_position_allow – If
true, multiple open positions in the same symbol are allowed. - platform – Specifies the brokerage platform used for trading (e.g.,
"IB"for Interactive Brokers). - inst_type – Defines the instrument type (
"FUT"for Futures contracts). - reverse_order_close – If
true, the system closes any opposite position before placing a new order. - token – The API token for each account.
- account_id – Unique identifier for each trading account. In this case,
"sdfghjkknx". - connection_name – Name assigned to the connection for easy identification (
"qwecfghvxs"). - risk_percentage – Defines the percentage of the account balance allocated for the trade (
0). - quantity_multiplier – Adjusts trade size by multiplying the base quantity. Here, it is set to
10, meaning the order size is multiplied by 10 for this account.
15. Troubleshooting Indicator Alert Automation for IBKR #
- Connection Issues? Ensure your IB account is active and reconnects.
- Need Help? Contact PickMyTrade support.
Email: [email protected]
Discord Community: Join & Connect
16. Risk Management Best Practices #
- Always define stop loss before entering a trade
- Use micro contracts (MNQ, MES) for smaller accounts
- Never risk more than 1–2% per trade
- Test strategies using paper trading first
17. Common Mistakes to Avoid #
- Oversizing positions relative to stop loss
- Trading illiquid contracts
- Forgetting to update contract expiration
- Using market orders during low liquidity
Summary #
Automating futures trading with PickMyTrade allows you to:
- Execute TradingView strategies automatically
- Control risk with strict sizing rules
- Trade futures professionally without manual execution
Correct sizing, order selection, and testing are the keys to long-term success.


